9 Islamic articles on: JavaScript

A guide to adding Google Drive (and OneDrive) upload functionality to Froala

Froala is a great JavaScript editor until you try to extend its functionality. Its documentation is horrible and there is little extra functionality you can add without having to do a lot of reverse-engineering and reading of GitHub comments.

Below is a guide to my solution for adding a Google Drive button to the Froala editor.

Here is the custom black and white icon I use for Google Drive to match the style of the rest of the Froala icons. The icon is from a free icons website and doesn’t require attribution.

Setting Up the Froala Google Drive Plugin

Place the following code inside a file that is included on the page along with the rest of the plugins you use (such as the file upload plugin). You can call it froala_google_drive_plugin.js:

$.FroalaEditor.DefineIcon('googleDriveIcon', {
    SRC: '/some/path/google_drive_bw.png',
    ALT: 'Google Drive', template: 'image'
});


$.FroalaEditor.RegisterCommand('googleDriveUpload', {
    title: 'Insert File From Google Drive',
    icon: 'googleDriveIcon',
    focus: false,
    undo: false,
    refreshAfterCallback: false,
    callback: function () {
        util.saveFroalaUserPlace(); // will be covered down below
    }
});

The above code registers an icon, then registers a Froala button that uses the icon. The callback function does nothing besides storing the user’s place in the editor (or the user’s selection, if they have selected any text right before clicking the Google Drive icon), otherwise their place will be lost once we insert the file, and the file would end up at the bottom of the editor. The user’s place in the editor is saved as a Range object. This will be covered down below.

Getting the Google Drive icon to show up

On the page where you have the Froala editor, your Froala initialization code may look something like this:

var froala_buttons = ['bold', 'italic', ...];
var froala_options = {
...
toolbarButtons: froala_buttons
};

$('#froala_editor_container').froalaEditor(froala_options);

To get the Google Drive icon to show up, add its command name to the buttons array. The command name is whatever name you used as the first argument to the RegisterCommand() function above.

var froala_buttons = ['bold', 'italic', ... , 'googleDriveUpload', ...];

A new way to initialize Froala

Above, I showed the usual way of initializing Froala:

$('#froala_editor_container').froalaEditor(froala_options);

That will have to be changed to this:

$('#froala_editor_container').on('froalaEditor.initialized', function (e, editor) {
    util.initFroalaGoogleDriveUpload(editor);
}).froalaEditor(froala_options);

Here we attach an event listener to the Froala container that is called as soon as Froala is done initializing. The event listener calls a custom function util.initFroalaGoogleDriveUpload(editor) that will set up the Google Drive buttons functionality. We pass the function the editor object. This is the Froala object, giving us access to the editor and its options, which we will use for various purposes. By using the editor object, we are able to handle having multiple Froala editors on the same page without issue, being able to insert files and images into the correct editor.

The Google Drive initialization function

Below is the function that is called when Froala loads, it binds a bunch of functionality to the Google Drive button.

window.util = {
    initFroalaGoogleDriveUpload: function (editor) {
        // get the icon object from the editor using jQuery find()
        var icon_el = editor.$box.find('[id^=googleDrive]')[0];

        // add a class to the button, to use for styling
        $(icon_el).addClass('google-drive-icon');

        // get the URL to use to handle the upload, here we use the same URL
        // as the one used by the file upload plugin
        var upload_handler_url = editor.opts.fileUploadURL;

        // The function that is called right after a user selects a file in the Google Drive picker
        var pick_callback = function (file) {
            util.storeGoogleDriveFileOnServer(file, upload_handler_url, util.froalaAjaxCallback, editor); // covered down below
        };


        util.initGoogleDrivePicker(icon_el, pick_callback); // covered down below
    },
    ...
}

Handling the Google Client

Please see my blog post A guide to using PHP to download Google Drive files selected by users in the Google Drive Picker for an overview of how the Google Drive picker works. Here I will use the same methods with some changes.

Since the binding of the Google Drive icon to the Google library has to be done after the library has loaded, the library is included in this way:


function googleClientHasLoaded() {
    util.google_client_loaded = true;
}
//I  have added slashes to the HTML tags in the code snippets here
// as this article was appearing 
//broken due to the browser trying to interpret the code
<\script src="https://apis.google.com/js/client.js?onload=googleClientHasLoaded">

The util.initGoogleDrivePicker() function

This function is called once, soon after page load, to bind the Google Drive picker library to the Froala icon. It uses a timeout to detect if the Google library has loaded. If not, it waits 500 milliseconds and tries again.

The callback is the pick_callback() function that was defined in util.initFroalaGoogleDriveUpload() above. When a user selects a file in the Google Drive picker, the onSelect() function is called, which extracts information from the file object, creates a new object from it, and passes that object to pick_callback().

window.util = {
...,
google_client_loaded = false,

// I use the library at https://gist.github.com/Daniel15/5994054
// to interface with the Google Drive Picker.
initGoogleDrivePicker: function (button_el, callback) {
        if (!util.google_client_loaded) {
            setTimeout(function () {
                util.initGoogleDrivePicker(button_el, callback);
            }, 500);
            return;
        }
        var picker = new FilePicker({
            apiKey: api_key,
            clientId: client_id,
            buttonEl: button_el,
            onSelect: function (file) {
                    callback({
                        id: file.id,
                        name: file.title,
                        extension: file.fileExtension,
                        mime_type: file.mimeType,
                        access_token: gapi.auth.getToken().access_token,
                    });
            }
        });
    },

Storing the file on the server

As you remember, or perhaps don’t, the pick_callback() function is as below:

var pick_callback = function (file) {
    util.storeGoogleDriveFileOnServer(file, upload_handler_url, util.froalaAjaxCallback, editor); 
};

The util.storeGoogleDriveFileOnServer() function is as below. It sends the file’s information to the server, the server stores the file (see the blog post I linked above for the details of storing the file). The server echoes out the download URL of the file, the link that users can go to to download the file. That download url, along with the file object and the editor, are passed to the callback. The callback is util.froalaAjaxCallback(), mentioned above in the pick_callback() function and covered down below.

    storeGoogleDriveFileOnServer: function (file, handler_url, callback, editor) {
        var data = {
            file: file,
            command: 'store-google-drive-file',
        }

        $.ajax({
            url: handler_url,
            type: 'post',
            data: data,
            error: function (data) {
            },
            success: function (download_url) {
                    callback(file, download_url, editor);
            }
        });
    },

Inserting the image or link into Froala with util.froalaAjaxCallback()

At this point, the Google Drive file is stored on our local server and we have a link to it that users can go to download the file. Now we need to insert that link into the editor.

   ...,
    froalaAjaxCallback: function (file, path, editor) {
        // restore the user's place in the editor, covered down below
        util.restoreFroalaUserPlace();


        // if the user has selected some text in the editor, insert a link to the file
        // and make the selected text the link text
        if (editor.selection.text().length) {
            var link_text = editor.selection.text();
        }
        else {
            var link_text = file.name;
        }

        // if the file has an image extension in its link, insert the file as an image
        if (/[.](png|jpg|gif|jpeg|svg)/.test(path)) {
            // if user has selected text in the editor, preserve the text, otherwise it will be
            // overwritten by the image
            if (editor.selection.text().length) {
                editor.html.insert(editor.selection.text() + '<\img id="fr-inserted-file" class="fr-image" src="' + path + '" />');
            }
            else {
                editor.html.insert('<\img id="fr-inserted-file" class="fr-image" src="' + path + '" />');
            }
        }
        else { // if not an image, insert a link to the file
            editor.html.insert('<\a id="fr-inserted-file" class="fr-file" href="' + path + '">' + link_text + '');
        }

        // Get the file.
        var $file = editor.$el.find('#fr-inserted-file');

        $file.removeAttr('id');

        editor.undo.saveStep();
    },

On saving and restoring the user’s place in the editor

Below is the code used to save and restore a user’s place in the editor, and any text they may have selected, as the Google Drive picker will make them lose their place/selection. The getSelection() and restoreSelection() functions are from a StackOverflow answer.

window.util {
        ...,
        froala_user_place = false;
        saveFroalaUserPlace() {
            util.froala_user_place = util.getSelection();
        },

        restoreFroalaUserPlace() {
            util.restoreSelection(util.froala_user_place);
        },

        getSelection: function () {
            if (window.getSelection) {
                sel = window.getSelection();
                if (sel.getRangeAt && sel.rangeCount) {
                    return sel.getRangeAt(0);
                }
            } else if (document.selection && document.selection.createRange) {
                return document.selection.createRange();
            }
            return null;
        },

        restoreSelection: function (range) {
            if (range) {
                if (window.getSelection) {
                    sel = window.getSelection();
                    sel.removeAllRanges();
                    sel.addRange(range);
                } else if (document.selection && range.select) {
                    range.select();
                }
            }
        },
}

OneDrive

The above solution should be easy to extend to support OneDrive as well. See these two guides of mine if you need help with the OneDrive picker: How to get a demo of the OneDrive File Picker JavaScript SDK to work on a local development server, A guide to using PHP to download OneDrive files selected by users in the OneDrive Picker.

Conclusion

I think that’s it. Some of the code above is from memory, so it may not compile. I throw everything into the util object for demo purposes, in my actual setup things are separated out into different objects and files.
A guide to using PHP to download OneDrive files selected by users in the OneDrive Picker

In my previous blog post  I described how to get the OneDrive picker to work on a local development server. In this post I will describe the second piece of the puzzle, downloading the file to a local server using PHP after the user selects it:

First, below is the JavaScript/jQuery used to open the file picker:

$(function() {
    $('.onedrive-button').click(function() {
        openOneDrivePicker();
    });
});

function openOneDrivePicker() {
    var odOptions = {
        clientId: client_id,
        action: "download",
        advanced: {
            redirectUri: redirect_uri,
        },
        multiSelect: true,
        openInNewWindow: true,
        success: function (files) { /* success handler */
            var files_array = files.value;
            for(var i in files_array) {
                window.processOneDriveFile(files_array[i]);
            }
        },
        cancel: function () { /* cancel handler */
        },
        error: function (e) { /* error handler */
        }
    }
    OneDrive.open(odOptions);
}

The success method goes through the file or files selected and calls a function called processOneDriveFile() on each one of the file objects.

Below is the code to the processOneDriveFile() function, which submits the file to a PHP handler file called file_handler.php:

// this function automatically submits the file to the server as soon
// as the user picks a file from the OneDrive picker. You may
// instead want to store the files in a variable and only submit when
// the user clicks some "Submit" button somewhere in your app.
function processOneDriveFile(file) {
    var file_name = file.name;
    var file_size = file.size;
    var download_url = file['@microsoft.graph.downloadUrl'];

    var data = {
        file_name : file_name,
        file_size : file_size,
        download_url : download_url,
        command : 'handle-onedrive-file',
    };
    
    $.ajax({
        url: '/path/to/file_handler.php',
        type: 'post',
        data: data,
        error: function (data) {
            console.debug(data);
        },
        success: function (data) {
            // success message
        }
    });
}

And here is the code for file_handler.php:

// bootstrap code

$command = $_POST['command'];

if('handle-onedrive-file' === $command) {
 $file_name = $_POST['file_name'];
 $file_size = $_POST['file_size'];
 $download_url = $_POST['download_url'];

 $ch = curl_init($download_url);
 curl_setopt($ch, CURLOPT_HEADER, 0);
 curl_setopt($ch, CURLOPT_RETURNTRANSFER, 1);
 curl_setopt($ch, CURLOPT_BINARYTRANSFER, 1);
 curl_setopt($ch, CURLOPT_FOLLOWLOCATION, true);
 curl_setopt($ch, CURLOPT_SSL_VERIFYPEER, false);
 curl_setopt($ch, CURLOPT_SSL_VERIFYHOST, false);
 curl_setopt($ch, CURLOPT_CONNECTTIMEOUT, 20);

 $data = curl_exec($ch);
 $code = curl_getinfo($ch, CURLINFO_HTTP_CODE);
 $content_type = curl_getinfo($ch, CURLINFO_CONTENT_TYPE);
 $error = curl_errno($ch);
 curl_close($ch);
 
 // A file with the same name may exist, that must be handled.
 $file_save_path = '/some/path/' . $file_name;

 file_put_contents($file_save_path, $data);
 
 echo 'File successfully retrieved and stored!';
}

That’s all. Make sure that the curl PHP library is installed and enabled (it is not sufficient to have the Linux curl utility, the code above uses the PHP library for it).

A guide to using PHP to download Google Drive files selected by users in the Google Drive Picker

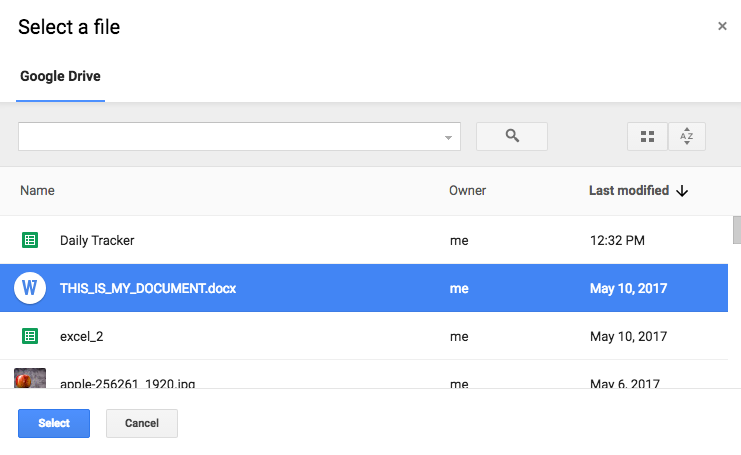
Let’s say you’ve managed to get the Google Drive JavaScript Picker API to work, and have also managed to coerce your users into logging into the Picker and selecting one of their files:

And you have verified that the onSelect function works properly:

function initGoogleDrivePicker() {
    var picker = new FilePicker({
        apiKey: api_key,
        clientId: client_id,
        buttonEl: document.getElementsByClassName('google-drive-button')[0],
        onSelect: function (file) {
            console.debug(file);
        }
    });
}

Where to go from here to send the file to the server and have it saved there?

First, we’ll create a function called processGoogleDriveFile(file), which will be added to the onSelect function of the picker:

function initGoogleDrivePicker() {
    var picker = new FilePicker({
        apiKey: api_key,
        clientId: client_id,
        buttonEl: document.getElementsByClassName('google-drive-button')[0],
        onSelect: function (file) {
            processGoogleDriveFile(file);
        }
    });
}

The function will be as follows. It will extract the file’s information, then use a jQuery AJAX request to send it to a PHP file called file_handler.php:

// this function automatically submits the file to the server as soon
// as the user picks a file from the Google Drive picker. You may
// instead want to store the files in a variable and only submit when
// the user clicks some "Submit" button somewhere in your app.
function processGoogleDriveFile(file) {
    var data = {
        file_id : file.id,
        file_name : file.title,
        extension: file.fileExtension,
        mime_type : file.mimeType,
        // the function below is provided by the library
        // from https://gist.github.com/Daniel15/5994054
        access_token : gapi.auth.getToken().access_token,
        command : 'handle-google-drive-file',
    };
    
    $.ajax({
        url: '/path/to/file_handler.php',
        type: 'post',
        data: data,
        error: function (data) {
            console.debug(data);
        },
        success: function (data) {
            // success message
        }
    });
}

On the back-end side, in file_handler.php, we have the following code:

// bootstrap code

$command = $_POST['command'];

if('handle-google-drive-file' === $command) {
    $file_id = $_POST['file_id'];
    $file_name = $_POST['file_name'];
    $extension = $_POST['extension'];
    $mime_type = $_POST['mime_type'];
    $access_token = $_POST['access_token'];
    
    // if this is a Google Docs file type (Google Docs, 
    // Spreadsheets, Presentations, etc.) we convert it
    // to a PDF using the export function of the API before saving it.
    // we could convert it to other file types that are also supported
    // by the API.
    if (stripos($mime_type, 'google')) {
        $getUrl = 'https://www.googleapis.com/drive/v2/files/' . $file_id .
        '/export?mimeType=application/pdf';
        $authHeader = 'Authorization: Bearer ' . $access_token;
        $file_name = $file_name . " (converted)";
        $extension = 'pdf';
        $file_mime_type = 'application/pdf';
    }
    else { // otherwise we download it the normal way
        $getUrl = 'https://www.googleapis.com/drive/v2/files/' . $file_id . 
        '?alt=media';
        $authHeader = 'Authorization: Bearer ' . $access_token;
    }

    $ch = curl_init($getUrl);
    curl_setopt($ch, CURLOPT_HEADER, 0);
    curl_setopt($ch, CURLOPT_RETURNTRANSFER, 1);
    curl_setopt($ch, CURLOPT_BINARYTRANSFER, 1);
    curl_setopt($ch, CURLOPT_FOLLOWLOCATION, true);
    curl_setopt($ch, CURLOPT_SSL_VERIFYPEER, false);
    curl_setopt($ch, CURLOPT_SSL_VERIFYHOST, false);
    curl_setopt($ch, CURLOPT_CONNECTTIMEOUT, 20);
    curl_setopt($ch, CURLOPT_HTTPHEADER, [$authHeader]);


    $data = curl_exec($ch);
    $code = curl_getinfo($ch, CURLINFO_HTTP_CODE);
    $error = curl_errno($ch);
    curl_close($ch);

    // 1. the file name could already have an extension in some cases,
    // that must be handled if needed.
    // 2. A file with the same name may exist, that must be handled.
    $file_save_path = '/some/path/' . $file_name . '.' . $extension;

    file_put_contents($file_save_path, $data);
    
    echo 'File successfully retrieved and stored!';
}

That’s all that is needed. Not all of Google’s proprietary MIME types can be converted to PDF. You must add a check to the onSelect or processGoogleDriveFile() JavaScript functions to check whether this is a MIME type you want to support. If it not, you can alert the user to choose another file.

Make sure that the curl PHP library is installed and enabled (it is not sufficient to have the Linux curl utility, the code above uses the PHP library for it).

How to get a demo of the OneDrive File Picker JavaScript SDK to work on a local development server

After getting the Google Drive file picker working on the page of a project I’m working on within just a few hours, I was faced with the task of getting the OneDrive JavaScript Picker to work, which I almost abandoned because of Microsoft’s brain-dead documentation. After hours of watching Microsoft videos and piecing together documentation, I finally got it to work.

Through it all, I was often reminded of this good old joke:

A helicopter was flying around above Seattle when an electrical malfunction disabled all of the aircraft's electronic navigation and communications qquipment. Due to the clouds and haze, the pilot could not determine the helicopter's position and course to fly to the airport. The pilot saw a tall building, flew toward it, circled, drew a handwritten sign, and held it in the helicopter's window. The pilot's sign said "WHERE AM I?" in large letters. People in the tall building quickly responded to the aircraft, drew a large sign and held it in a building window. Their sign read: "YOU ARE IN A HELICOPTER." The pilot smiled, waved, looked at her map, determined the course to steer to SEATAC airport, and landed safely. After they were on the ground, the co-pilot asked the pilot how the "YOU ARE IN A HELICOPTER" sign helped determine their position. The pilot responded "I knew that had to be the Microsoft building because, like their technical support, online help and product documentation, the response they gave me was technically correct, but completely useless."

So here is how to actually get their amazing picker to work. I will assume you’ve already created your app in the App Portal.

1. Enabling SSL

You must first enable SSL on your demo server if you don’t have it. To do that quickly and for free, create a self-signed certificate and install it. Here is a guide on creating a self-signed SSL certificate.

When creating the certificate, don’t forget to use the Fully Qualified Domain Name for your local server. I use the fake domain myproject.dev as the domain name for my project, and put www.myproject.dev as the FQDN.

After you have generated your .key and .crt files, put them in /etc/ssl/crt/ or some such similar place.

With that done, create an SSL virtual host that uses the files you created, as follows (this is for a PHP website). The following code will have to be added wherever you have your VirtualHosts, it could be apache2.conf, or in a new file (such as ssl_vhost.conf) placed inside the sites-available directory (/etc/apache2/sites-available). If you put it in sites-available, you will have to run the command a2endsite /etc/apache2/sites-available/the_file_name_I_used.conf to enable the vhost.


ServerName default

## Vhost docroot
DocumentRoot "/var/www/html"
SSLEngine on
SSLCertificateFile /etc/ssl/crt/myproject.crt
SSLCertificateKeyFile /etc/ssl/crt/myproject.key

## Directories, there should at least be a declaration for /var/www/html

Options Indexes FollowSymlinks MultiViews
AllowOverride All
Require all granted


Require all granted
SetHandler proxy:fcgi://127.0.0.1:9000
## Logging
ErrorLog "/var/log/apache2/default_vhost_error.log"
ServerSignature Off
CustomLog "/var/log/apache2/default_vhost_access.log" combined

## Custom fragment

2. Creating the URI Redirect File

Somewhere in your file structure, for example in /var/www/html, create a file called onedrive_picker_redirect.html (or any other name you choose). The file has to load the OneDrive JavaScript SDK, it doesn’t have to do anything else. Here is the contents of the file (note that I’m using version 7.0 of the SDK, use whichever one you want to use for your project):

3. Add a link to the redirect file in the Microsoft App Portal

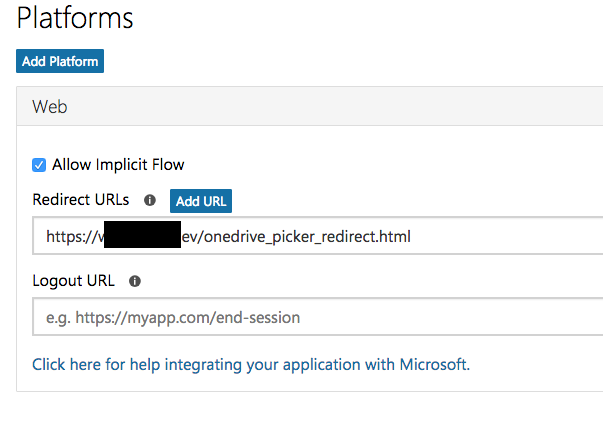
Put the full SSL link to the redirect file (such as https://www.myproject.dev/onedrive_picker_redirect.html) in the App portal, as shown in the screenshot below. You can keep the Logout URL blank.

4. Add the redirect file to the OneDrive picker launcher using the “advanced” parameter

We now get to the easy part. On the file from which you want to launch the picker, add the following code to launch the picker, or modify your existing code to match below. Notice the redirectUri parameter, which has to exactly match the one you used in step 3.

5. Go to your demo page using the HTTPS URL

The picker will not work if you try to launch it from a non-https page. If you were doing your development on a non-https URL earlier, you will now have to go to the same page under https. If earlier the page was at www.myproject.dev/onedrive_picker_demo.php, now go to https://www.myproject.dev/onedrive_picker_demo.php.

6. Now try it out

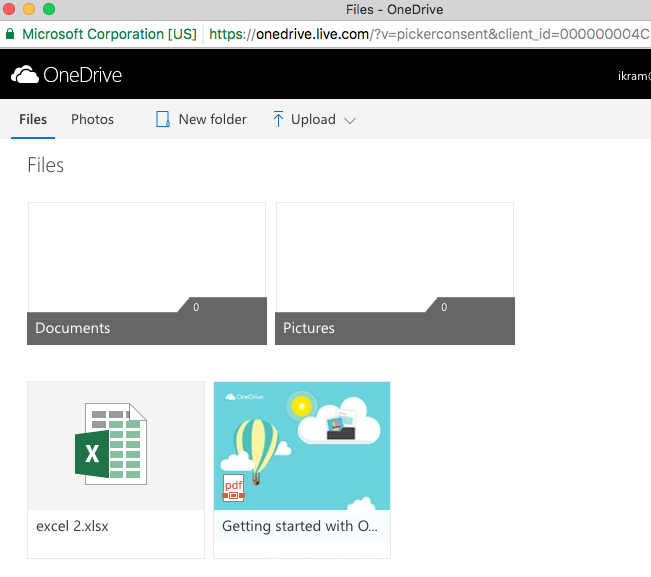
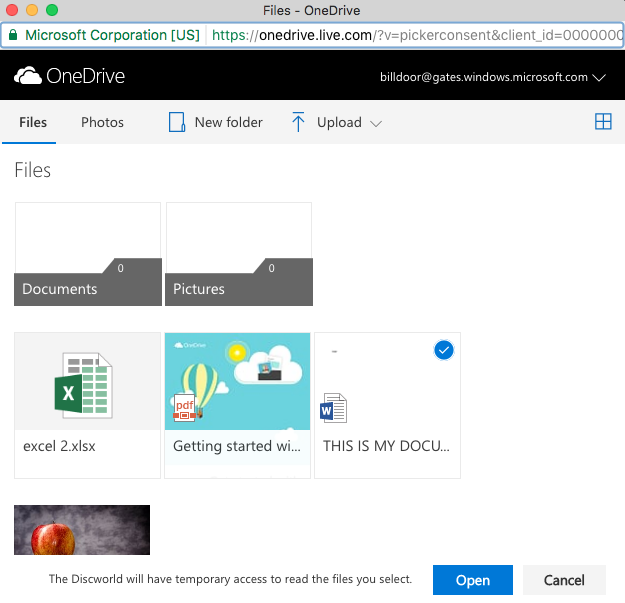
Now click the button to launch the picker. You will get a login prompt. After logging in, you will get the picker. Click on any file you want and click “Open”.

7. Look at the console

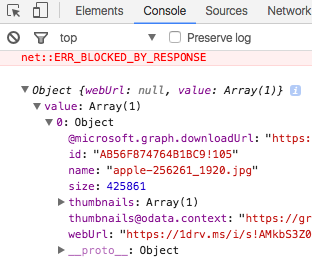
To verify that everything is working properly, open the console, and if you used the picker code above that I used, you should see an object that contains the information for the file you picked:

8. Go back to square one

Now that we have gotten Microsoft’s limitless supply of self-absorbed ineptitude out of the way, we can get to do some actual coding to interface with their horrible products and discover entirely new and never-before-experienced ways of suffering.

If you want to send the file info to a server to store it there, see my blog post on using PHP to download OneDrive files picked from the picker.

How I solved “jQuery Ajax Uncaught TypeError: Cannot read property ‘type’ of undefined”

A solution for an error occurring during a jQuery $.ajax request.

I was using this common jQuery Ajax pattern on a page I am working:

    $(function () {
        $(document).on('click', '.create-domain .submit', function (e) {
            e.preventDefault();

            var data = {
                domain_description: $('.create-domain .domain-description-textarea')
        }

            $.ajax({
                type: 'post',
                url: '/process/something.php',
                data: data,
                error: function (data) {
                    console.debug(data);
                },
                success: function (response) {
                   //stuff
                }
            });
        });

But on clicking the submit element, I kept getting this cryptic error:

Uncaught TypeError: Cannot read property 'type' of undefined
    at r.handle (jquery-2.2.4.min.js:3)
    at e (jquery-2.2.4.min.js:4)
    at Gb (jquery-2.2.4.min.js:4)
    at Gb (jquery-2.2.4.min.js:4)
    at Gb (jquery-2.2.4.min.js:4)
    at Gb (jquery-2.2.4.min.js:4)
    at Function.n.param (jquery-2.2.4.min.js:4)
    at Function.ajax (jquery-2.2.4.min.js:4)
    at HTMLButtonElement. (something.php:575)
    at HTMLDocument.dispatch (jquery-2.2.4.min.js:3)
    at HTMLDocument.r.handle (jquery-2.2.4.min.js:3)

The problem was that in the data variable, I was including an HTML element (a textarea) inside the data variable, instead of including the textarea‘s content. Thus the corrected code is (notice the .val() at the end):

            var data = {
                domain_description: $('.create-domain .domain-description-textarea').val(),
        }

Hopefully this will help a few people, helping making the world economy more efficient by 1*10-12% (saving the world economy $107 USD over the next year).

Mashing two regular expressions together in JavaScript on the fly

var pattern1 = /Aug/;
var pattern2 = /ust/;
var fullpattern = (new RegExp( (pattern1+'').replace(/^\/(.*)\/$/,'$1') + (pattern2+'').replace(/^\/(.*)\/$/,'$1') ));

Explanation:

  • pattern1+'' turns (“casts”) the regular expression object into a string.
  • .replace(/^\/(.*)\/$/,'$1') removes the beginning and ending slashes from the pattern
  • new RegExp() turns the resultant string into a regular expression object. There is no need to add back a regular expression delimiter (i.e. slashes usually) since the RegExp() function (“constructor”) adds the delimiter if it is lacking.
  • If you want the resultant expression to have a flag, for example i, you add it so: new RegExp(string,'i');
  • This code is quite unreadable and you might be doing yourself and others a kindness if you use a less clever method. To make it more readable, the technique can be wrapped in a function:
var rmash = function(reg1,reg2) {
var fullpattern = (new RegExp( (reg1+'').replace(/^\/(.*)\/$/,'$1') + (reg2+'').replace(/^\/(.*)\/$/,'$1') ));
return fullpattern;
};

var my_new_pattern = rmash(pattern1,pattern2);

Generalizing the mash function to handle an arbitrary number of regular expressions and flags is left as an exercise.

How to do long-running computations in JavaScript while avoiding the “maximum call stack size exceeded” error

The following program calculates the value of the series of the Basel Problem. The result is a number that starts with 1.644934. Like π, this sequence can go on forever, which means the program never exits. Without proper design, such a program runs into the maximum call stack size exceeded error, which is designed to prevent a program from using too much memory.

var cr = 1;
var total = 0;
var x = function() {

    total = total + (1/(cr*cr));

    
    if(! (cr % 20000)) {
        $('#t1').val(total);
        $('#t2').val(cr);
        setTimeout(x,0);
    }
    else {
        x();
    }
    cr++;

};
x(); //initial call to x().

The solution is to add a setTimeout call somewhere in the program before things get too close to exceeding the call stack. In the above program, cr is a counter variable that starts with 1 and increases by 1 for every iteration of the x function. Using the conditional if(! (cr % 20000)) allows the program to catch its breath every 20,000 iterations and empties the call stack. It checks whether cr is divisible by 20,000 without a remainder. If it is not, we do nothing and let the program run its course. But if is divisible without a remainer, it means we have reached the end of a 20,000 iteration run. When this happens, we output the value of the total and the cr variables to two textboxes, t1 and t2.

Next, instead of calling x() the normal way, we call it via setTimeout(x,0);. As you know, setTimeout is genearlly used to run a function after a certain amount of time has passed, which is why usually the second argument is non-zero. But in this case, we do not need any wait time. The fact that we are calling x() via setTimeout is what matters, as this breaks the flow of the program, allowing proper screen output of the variables and the infinite continuation of the program.

The program is extremely fast, doing 1 million iterations about every 2.4 seconds on my computer. The result (the value of total) is not perfectly accurate due to the limitations of JavaScript numbers. More accuracy can be had using an extended numbers library.

You may wonder why we cannot put all calls to x() inside a setTimeout(). The reason is that doing so prevents the JavaScript interpreter from optimizing the program, causing it to run extremely slowly (about 1000 iterations per second on my computer). Using the method above, we run the program in optimized blocks of 20,000 iterations (the first block is actually 19,999 iterations since cr starts from 1, but for simplicity I have said 20,000 throughout the article).

Using an object anonymously in JavaScript

var month = 'Jan'; //or another three-letter abbreviation

//After the following operation, proper_month will contain the string "January".
var proper_month = {'Jan':'January',
                              'Feb': 'February',
                              'Mar' : 'March',
                              'Apr' : 'April',
                              'May'   : 'May',
                              'Jun'  : 'June',
                              'Jul'  : 'July',
                              'Aug'   : 'August',
                              'Sep'  : 'September',
                              'Oct'   : 'October',
                              'Nov'   : 'November',
                              'Dec'   : 'December'
                             
                             }[month];

Using jQuery and JSON to recover from a failed TablePress save

I was happily working away on my 700+ row table in TablePress, saving occasionally. Server issues came up and I was prevented from saving for a few hours. Eventually the server was back up again and I wanted to save, but I ran into the dreaded Ajax save failure message.

Even using shift+save did not work, taking me to the silly and useless Are you sure? WordPress page.

Refreshing the page would have meant losing many hours of work. I tried various ideas but all failed. The most desperate idea was to use jQuery to get the values of all the table cells, put them into an array, copy the string of the array, refresh the page, use jQuery to feed the array back into the cells. I tried to do it in Firefox, using the built-in inspector and Firebug, only to be reminded of how much I dislike Firefox’s slow and clunky inspector tools (I was using Firefox since it performs better than Chrome on super-sized web apps like a massive TablePress table).

So I needed a way to move my work to Chrome, but how? I saved the TablePress page as an HTML document on my computer, then opened it in Chrome. Saving the editor as an HTML document causes the values of the input fields to be saved, thus when I opened it in Chrome all the values of the cells where there.

Next, I used a jQuery bookmark to load jQuery on the page in Chrome, then I ran the following two lines in the console:

my_array = [];
$('textarea').each(function(){ my_array.push($(this).val()); });

The above code loads the values of the textboxes into an array. The Chrome console doesn’t have a way of letting you copy an object or array’s source code so that you can paste it somewhere else, therefore we have to improvise. We know that the console will print out the value of any object, and if it is a string, it will plainly print the string.

In the above example, we place the word “hello” in the variable x, then on the next line simply write the name of the variable and press enter, causing chrome to give us the string “hello”. As seen below, if type the name of an array variable, Chrome enables us to browse the values inside the array. This is usually helpful, but not this time, since we need the array in format that can be copied.

What we need is to stringify the array somehow. In this case, the JavaScript JSON API comes to the rescue. We place the array my_array inside the my_string variable using the line below:

var my_string = JSON.stringify(my_array);

Afterwards, we type my_string into the console, causing Chrome to show the plaintext version of the array:

We then copy the entire text (making sure to skip the beginning and end quotes added by the stringify function, since we won’t be needing them), then open the TablePress backend on a new tab, loading the table we were working on. The table will lack the cells we had added but could not save. Now we populate this working backend with the data we copied. We open the console, re-enable jQuery using the bookmark, and use the following line to load the text into an array. We do not have a need to use the JSON API’s parse function, since the plaintext is already a valid array initialization.

Below we see the array my_array, ready to be populated with the string we copied:

Next, we use the line below to add the values of the array into the table:

$('textarea').each(function(){ $(this).val(my_array.shift());   });

All done! In the first .each function above, we used my_array.push() to add values to the end of the array. To keep the values in order, we now use my_array_.shift(), getting items from the beginning of the array and feeding them to the textareas from first to last.

In this way I managed to get my work back. Another solution I could have tried would have been to see if WordPress could be forced to accept the data that it was rejecting (it was rejecting it due to an expired session or something like that). But such a solution may have required a lot more work and possibly modifications to the WordPress core, which is always risky and not fun.