![]()
Froala is a great JavaScript editor until you try to extend its functionality. Its documentation is horrible and there is little extra functionality you can add without having to do a lot of reverse-engineering and reading of GitHub comments.
Below is a guide to my solution for adding a Google Drive button to the Froala editor.
Here is the custom black and white icon I use for Google Drive to match the style of the rest of the Froala icons. The icon is from a free icons website and doesn’t require attribution.
![]()
Setting Up the Froala Google Drive Plugin
Place the following code inside a file that is included on the page along with the rest of the plugins you use (such as the file upload plugin). You can call it froala_google_drive_plugin.js:
$.FroalaEditor.DefineIcon('googleDriveIcon', {
    SRC: '/some/path/google_drive_bw.png',
    ALT: 'Google Drive', template: 'image'
});


$.FroalaEditor.RegisterCommand('googleDriveUpload', {
    title: 'Insert File From Google Drive',
    icon: 'googleDriveIcon',
    focus: false,
    undo: false,
    refreshAfterCallback: false,
    callback: function () {
        util.saveFroalaUserPlace(); // will be covered down below
    }
});
The above code registers an icon, then registers a Froala button that uses the icon. The callback function does nothing besides storing the user’s place in the editor (or the user’s selection, if they have selected any text right before clicking the Google Drive icon), otherwise their place will be lost once we insert the file, and the file would end up at the bottom of the editor. The user’s place in the editor is saved as a Range object. This will be covered down below.
Getting the Google Drive icon to show up
On the page where you have the Froala editor, your Froala initialization code may look something like this:
var froala_buttons = ['bold', 'italic', ...];
var froala_options = {
...
toolbarButtons: froala_buttons
};

$('#froala_editor_container').froalaEditor(froala_options);
To get the Google Drive icon to show up, add its command name to the buttons array. The command name is whatever name you used as the first argument to the RegisterCommand() function above.
var froala_buttons = ['bold', 'italic', ... , 'googleDriveUpload', ...];
A new way to initialize Froala
Above, I showed the usual way of initializing Froala:
$('#froala_editor_container').froalaEditor(froala_options);
That will have to be changed to this:
$('#froala_editor_container').on('froalaEditor.initialized', function (e, editor) {
    util.initFroalaGoogleDriveUpload(editor);
}).froalaEditor(froala_options);
Here we attach an event listener to the Froala container that is called as soon as Froala is done initializing. The event listener calls a custom function util.initFroalaGoogleDriveUpload(editor) that will set up the Google Drive buttons functionality. We pass the function the editor object. This is the Froala object, giving us access to the editor and its options, which we will use for various purposes. By using the editor object, we are able to handle having multiple Froala editors on the same page without issue, being able to insert files and images into the correct editor.
The Google Drive initialization function
Below is the function that is called when Froala loads, it binds a bunch of functionality to the Google Drive button.
window.util = {
    initFroalaGoogleDriveUpload: function (editor) {
        // get the icon object from the editor using jQuery find()
        var icon_el = editor.$box.find('[id^=googleDrive]')[0];

        // add a class to the button, to use for styling
        $(icon_el).addClass('google-drive-icon');

        // get the URL to use to handle the upload, here we use the same URL
        // as the one used by the file upload plugin
        var upload_handler_url = editor.opts.fileUploadURL;

        // The function that is called right after a user selects a file in the Google Drive picker
        var pick_callback = function (file) {
            util.storeGoogleDriveFileOnServer(file, upload_handler_url, util.froalaAjaxCallback, editor); // covered down below
        };


        util.initGoogleDrivePicker(icon_el, pick_callback); // covered down below
    },
    ...
}
Handling the Google Client
Please see my blog post A guide to using PHP to download Google Drive files selected by users in the Google Drive Picker for an overview of how the Google Drive picker works. Here I will use the same methods with some changes.
Since the binding of the Google Drive icon to the Google library has to be done after the library has loaded, the library is included in this way:
function googleClientHasLoaded() {
    util.google_client_loaded = true;
}
//I  have added slashes to the HTML tags in the code snippets here
// as this article was appearing
//broken due to the browser trying to interpret the code
<\script src="https://apis.google.com/js/client.js?onload=googleClientHasLoaded">
The util.initGoogleDrivePicker() function
This function is called once, soon after page load, to bind the Google Drive picker library to the Froala icon. It uses a timeout to detect if the Google library has loaded. If not, it waits 500 milliseconds and tries again.
The callback is the pick_callback() function that was defined in util.initFroalaGoogleDriveUpload() above. When a user selects a file in the Google Drive picker, the onSelect() function is called, which extracts information from the file object, creates a new object from it, and passes that object to pick_callback().
window.util = {
...,
google_client_loaded = false,

// I use the library at https://gist.github.com/Daniel15/5994054
// to interface with the Google Drive Picker.
initGoogleDrivePicker: function (button_el, callback) {
        if (!util.google_client_loaded) {
            setTimeout(function () {
                util.initGoogleDrivePicker(button_el, callback);
            }, 500);
            return;
        }
        var picker = new FilePicker({
            apiKey: api_key,
            clientId: client_id,
            buttonEl: button_el,
            onSelect: function (file) {
                    callback({
                        id: file.id,
                        name: file.title,
                        extension: file.fileExtension,
                        mime_type: file.mimeType,
                        access_token: gapi.auth.getToken().access_token,
                    });
            }
        });
    },
Storing the file on the server
As you remember, or perhaps don’t, the pick_callback() function is as below:
var pick_callback = function (file) {
    util.storeGoogleDriveFileOnServer(file, upload_handler_url, util.froalaAjaxCallback, editor);
};
The util.storeGoogleDriveFileOnServer() function is as below. It sends the file’s information to the server, the server stores the file (see the blog post I linked above for the details of storing the file). The server echoes out the download URL of the file, the link that users can go to to download the file. That download url, along with the file object and the editor, are passed to the callback. The callback is util.froalaAjaxCallback(), mentioned above in the pick_callback() function and covered down below.
    storeGoogleDriveFileOnServer: function (file, handler_url, callback, editor) {
        var data = {
            file: file,
            command: 'store-google-drive-file',
        }

        $.ajax({
            url: handler_url,
            type: 'post',
            data: data,
            error: function (data) {
            },
            success: function (download_url) {
                    callback(file, download_url, editor);
            }
        });
    },
Inserting the image or link into Froala with util.froalaAjaxCallback()
At this point, the Google Drive file is stored on our local server and we have a link to it that users can go to download the file. Now we need to insert that link into the editor.
   ...,
    froalaAjaxCallback: function (file, path, editor) {
        // restore the user's place in the editor, covered down below
        util.restoreFroalaUserPlace();


        // if the user has selected some text in the editor, insert a link to the file
        // and make the selected text the link text
        if (editor.selection.text().length) {
            var link_text = editor.selection.text();
        }
        else {
            var link_text = file.name;
        }

        // if the file has an image extension in its link, insert the file as an image
        if (/[.](png|jpg|gif|jpeg|svg)/.test(path)) {
            // if user has selected text in the editor, preserve the text, otherwise it will be
            // overwritten by the image
            if (editor.selection.text().length) {
                editor.html.insert(editor.selection.text() + '<\img id="fr-inserted-file" class="fr-image" src="' + path + '" />');
            }
            else {
                editor.html.insert('<\img id="fr-inserted-file" class="fr-image" src="' + path + '" />');
            }
        }
        else { // if not an image, insert a link to the file
            editor.html.insert('<\a id="fr-inserted-file" class="fr-file" href="' + path + '">' + link_text + '');
        }

        // Get the file.
        var $file = editor.$el.find('#fr-inserted-file');

        $file.removeAttr('id');

        editor.undo.saveStep();
    },
On saving and restoring the user’s place in the editor
Below is the code used to save and restore a user’s place in the editor, and any text they may have selected, as the Google Drive picker will make them lose their place/selection. The getSelection() and restoreSelection() functions are from a StackOverflow answer.
window.util {
        ...,
        froala_user_place = false;
        saveFroalaUserPlace() {
            util.froala_user_place = util.getSelection();
        },

        restoreFroalaUserPlace() {
            util.restoreSelection(util.froala_user_place);
        },

        getSelection: function () {
            if (window.getSelection) {
                sel = window.getSelection();
                if (sel.getRangeAt && sel.rangeCount) {
                    return sel.getRangeAt(0);
                }
            } else if (document.selection && document.selection.createRange) {
                return document.selection.createRange();
            }
            return null;
        },

        restoreSelection: function (range) {
            if (range) {
                if (window.getSelection) {
                    sel = window.getSelection();
                    sel.removeAllRanges();
                    sel.addRange(range);
                } else if (document.selection && range.select) {
                    range.select();
                }
            }
        },
}
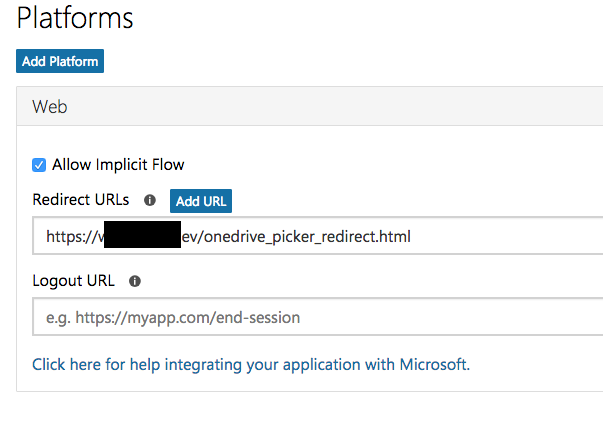
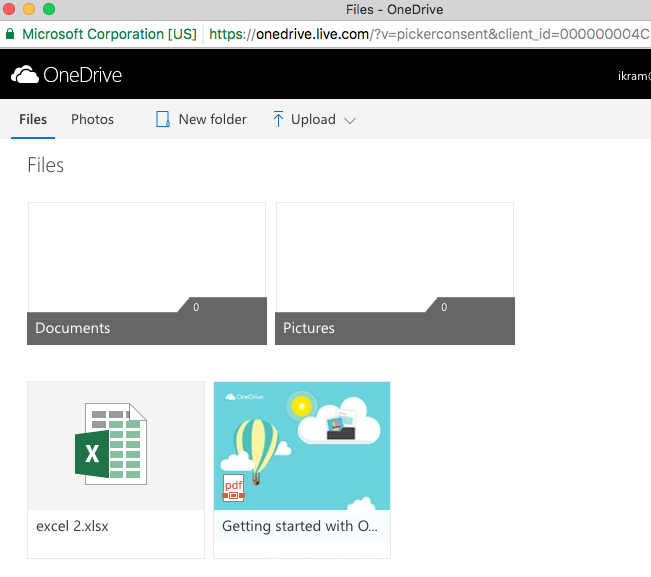
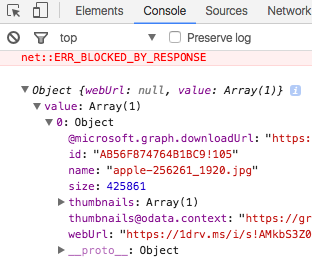
OneDrive
The above solution should be easy to extend to support OneDrive as well. See these two guides of mine if you need help with the OneDrive picker: How to get a demo of the OneDrive File Picker JavaScript SDK to work on a local development server, A guide to using PHP to download OneDrive files selected by users in the OneDrive Picker.
Conclusion
I think that’s it. Some of the code above is from memory, so it may not compile. I throw everything into the util object for demo purposes, in my actual setup things are separated out into different objects and files.