Master the Basics of Coding in Under Two Hours in Interactive Steps and Visual Examples
You are viewing an online version of Ikram Hawramani’s Ultimate Programming Crash Course. You can get this book as a Kindle ebook and paperback on Amazon.com
Methods for using this guide:
- View the online version on this page (scroll down)
- Download a free PDF version
- Download a free Mobi version (for e-readers and ebook-reading apps, zipped)
- Buy the Kindle version on Amazon
- Buy the paperback version on Amazon
Copyright © 2018 Ikram Hawramani
All rights reserved. No part of this publication may be reproduced, stored in a retrieval system, or transmitted, in any form or by any means for commercial purposes without prior permission of the author. The author affirms the readers’ right to share this book for personal, non-commercial purposes.
About the Author
Ikram Hawramani is a veteran web designer and developer who has been building websites since 2001. He has worked as a full stack web developer and lead engineer for startups and now runs his own web publishing business. His other technical works include Cloud Computing for Complete Beginners, HTML & CSS for Complete Beginners and Object-Oriented PHP Best Practices.
Contents
1. An Introduction to Programming
Tinkering with JavaScript using JS Tinker
4. Conditionals and Comparisons
Bracket notation and dynamic properties
1. An Introduction to Programming
Computers are incapable of learning, but they are capable of following instructions. Programming is how we write those instructions.
This book uses JavaScript to teach you programming because it is a language that is used everywhere (almost every website and smartphone app uses it, for example), because using it does not require installing special software on your computer.
To begin, I will show you how to create a webpage on your computer and how to put a bit of JavaScript inside it. This will show you how easy it is to get into using JavaScript regardless of what system you are using. Soon after I will introduce you to a learning environment that helps you use JavaScript without needing to deal with files. I will use a Microsoft Windows computer in this example. In the rest of the book it does not matter what system you use, the examples will work the same way on every system, even on tablets and smartphones.
A webpage is a document (i.e. a file on a computer) that uses the HTML language to “markup” its contents. When browsing the web, whether it is Facebook, Google or Apple.com that you are viewing, you are always viewing a webpage created with HTML.
HTML stands for Hypertext Markup Language. HTML was designed to solve the problem of telling computers how to display a document. Below is a screenshot of a typical computer file before the invention of HTML. The file was created almost 50 years ago, on April 7, 1969. It belongs to a series of documents called RFCs which have continued to this day. These documents are used by the maintainers of the Internet to discuss the development of the infrastructure and technologies related to it.
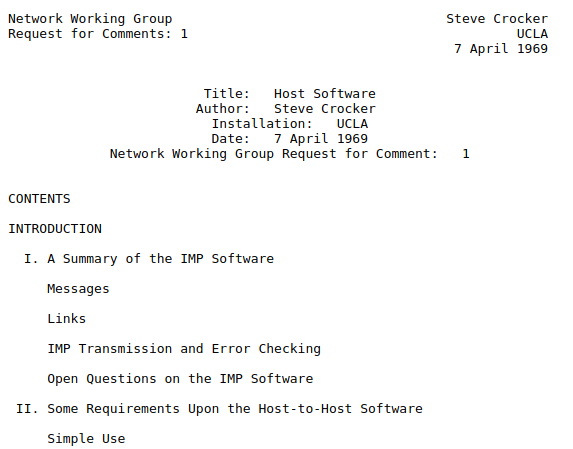
Notice how bland the document looks. This is because it is a “plaintext” document. As the Internet developed and the World Wide Web was created, there was a need for the ability to create more sophisticated documents. The HTML language was created to fulfill this need. It allows us to make text bold and italic, to show images, and to create links that take users from one document to another. Later, JavaScript was created to fulfill the need for making webpages interactive and dynamic, enabling the creation of things like sophisticated web apps and games.
The way HTML works is that you write code that tells the computer how to display a document:

Above, on the left-hand side we have some HTML code. When this code is seen by a computer (pictured as a robot above), it understands it as an instruction to print the word “Hello!” in italics. On the right-hand side we have the result of what the computer will print out, for example on a printer or on the user’s screen.
On an ordinary computer, you can type out HTML code using text-editing programs like Notepad, Wordpad, TextEdit and others, save the file as an HTML document, then open the file in a web browser to have your computer “interpret” the HTML and display the results.
There are, therefore, two “sides” to an HTML document. There is the code that defines the document (shown on the left-hand side above), then there is the “result”, on the right-hand side, which is what the document actually looks like. It is the computer’s job to read the code, interpret it and display the document. When you visit a like Google.com, this is what actually takes place; your computer downloads a bunch of HTML code that looks like this:

The above is the actual code taken from Google.com, it goes on for over 1000 lines. Your computer reads this code, interprets it, and displays the results. The result is that you see the Google homepage. The program that fetches the code and displays the webpage for you is called a “web browser”. Popular web browsers include Google Chrome, Mozilla Firefox, Microsoft Edge and Apple Safari. Below is an artistic rendition of what a web browser looks like, with the Google homepage opened inside it:

The browser is the thing with the tabs, back and forward buttons and address bar. It is a program that displays webpages for you, and it also interprets and runs JavaScript code as we will see.
To create a webpage on your computer, first open the Notepad program (for example by typing “Notepad” in the Start menu) (on a Mac, you would open TextEdit). Inside Notepad, write the following:
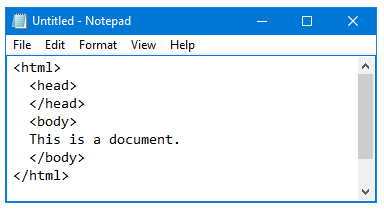
Above, we have written the definition for a barebones webpage. The spacing and indentation do not matter, you can write the above code all on one line.
Whenever you open a website on your computer, you are actually viewing a webpage transmitted from the website’s computer to your computer. There is no need to worry about what <html>, <head>, etc. means right now.
After writing the above inside Notepad, go to File -> Save. Type anything you want as the file name, but end it with .html. This tells the computer you are making a webpage. Below I have chosen “my_first_web_page.html” as my file name.
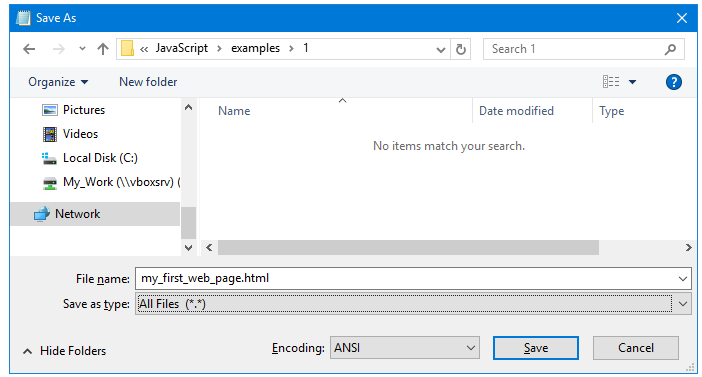
Once you are finished with saving the file, you will see something like the following if you look inside the folder where you saved the file:
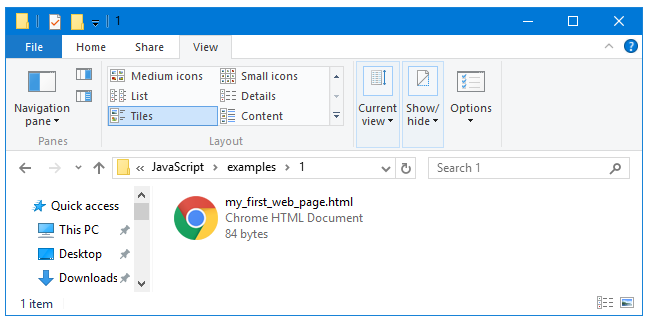
The file’s icon will be different depending on your system. This does not make a difference for our purposes. Now, double-click the file to open it. Here is what shows up on my computer:
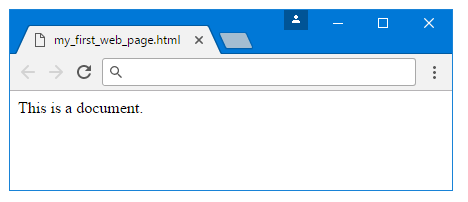
We have now created a webpage. If you put this file on a “server” (a type of computer connected to the Internet), people will be able to access it on the Internet.
Using the power of HTML, we can now make visual changes to the document. For example we can bold the word “document” by adding <b> and </b> before and after the word:
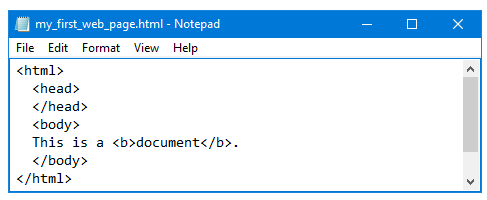
If we now open the webpage again in a browser, this is what we will see:

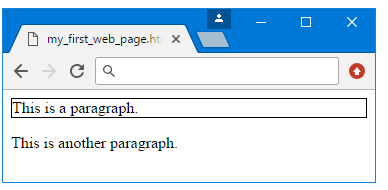
Below, I have changed the webpage in Notepad by adding two paragraphs to it—the first one has a black border around it:
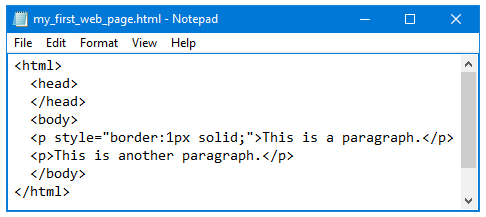
Here is the result:
It is not the purpose of this book to teach HTML, I am merely giving you a glimpse of what it looks like. We will now start adding JavaScript to the webpage. Open the file again inside Notepad (open Notepad, then choose File -> Open) and add the following three lines to it (starting with <script> and ending with </script>):
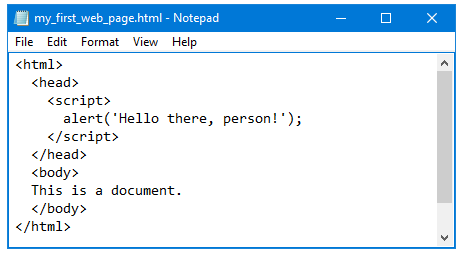
Make sure to type the single quotation marks before Hello and after the exclamation mark (the semicolon is not strictly necessary in this specific example). Save the file again and open it again in a browser, and this is what now happens:
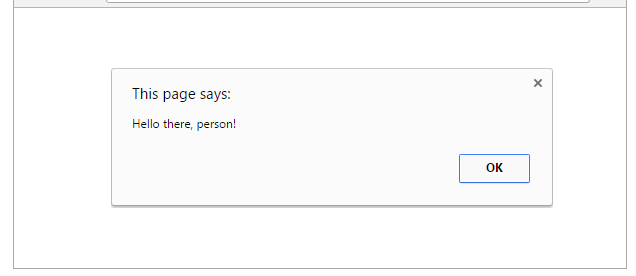
As soon as you open the webpage, a dialog box opens. What you are seeing above is a JavaScript “alert”, which is used to notify users about certain things. We have now officially done some JavaScript programming. In the HTML code, everything that goes between <script> and </script> is JavaScript code. Let’s look at it again:

We have two computer languages interacting with each other here. The first one is HTML, as we discussed. But inside the document, we use <script> to tell the computer that everything from there on is JavaScript, then use </script> (note the slash) to tell the computer the JavaScript ends here and the HTML starts again after it.
We have a single line of JavaScript in the above example:
alert(‘Hello there, person!’);
This line tells the computer to show an alert to the user when the user opens the file. If this webpage was placed on a website, any user visiting the site will have seen this alert. If the people at Google put this line of code in the JavaScript section of Google.com, everyone opening the Google homepage would have been shown such an alert.
And this is what coding or programming is. By writing a special piece of code (in the above example, by writing alert(‘Hello there, person!’)), you command the computer to do a specific thing that you want it to do.
There is no need to worry about memorizing any of the code in this chapter. I am merely showcasing parts of JavaScript for you so that you can get a general feel for the way the language is used.
Let’s now see another example. What if you wanted your webpage to show what the square root of 555 is? Below, I have removed the alert… inside the JavaScript and changed it as follows:

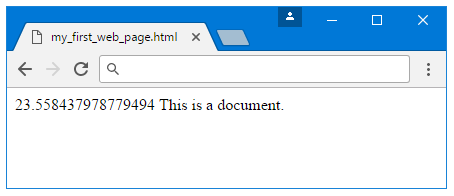
The above JavaScript tells the computer: “When a person opens this webpage, write out the square root of 555 at the beginning of the document”. If we now open the webpage, this is what we see:
We used a multi-layered JavaScript command (or more correctly, JavaScript “statement”) to tell the computer what to do. The document.write() command tells the computer: Write out anything you see between the brackets. We could have written document.write(‘Hello!’) instead, as follows:

And the result would have been as follows:
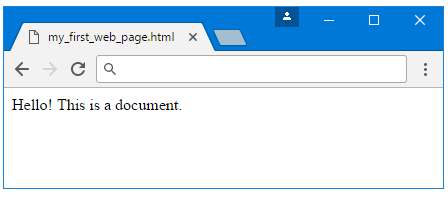
That is not very useful, since we can write a Hello! Without using any JavaScript. But by writing document.write(Math.sqrt(555)) we use JavaScript’s mathematical powers to do a complicated calculation behind the scenes and show people the result inside the webpage when they view it inside a browser.
When the browser sees this line of JavaScript code, it knows that what we want is for it to calculate the square root of 555, then to write out the result inside the document. Since we did not tell the computer how to display the results, it showed us the square root of 555 with 15 decimals: 23.558437978779494, which is a rather unnecessary level of detail. Computers have no common sense, so if we want them to do things a certain way, we have to spell it out for them. For example, we can use JavaScript’s mathematical rounding powers to tell the computer to display the result in a more sensible way:

Now, if we save the document and reload the webpage:
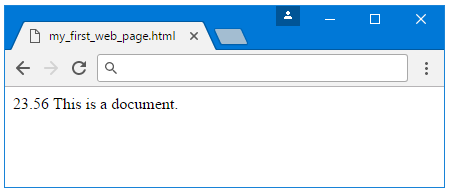
The JavaScript we are using (document.write(Math.sqrt(555).toFixed(2));) tells the computer to perform three actions one after the other. The first action is Math.sqrt(555), which tells the computer to find out the square root of 555. The next action is toFixed(2), which tells the computer to round the result of the previous action to two decimal places. The final action is document.write(), which tells the computer to write out the result inside the document. Without document.write(), the computer still performs the calculations, but it will not show the result:
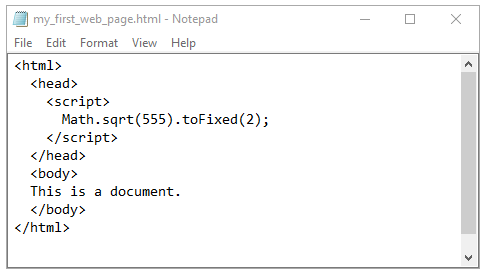
Here is the result:
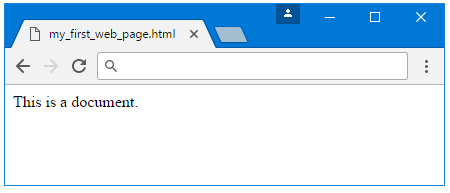
That is quite useless, which is why we have to use some method of outputting the result of the calculation. To “output” something means to show users the result of some computer action. Without output, things may happen behind the scenes, but a person viewing the webpage will not be shown anything interesting. This is sometimes useful, for example companies like Google and Facebook use JavaScript to store information about you behind the scenes and send it back to their own computers. They then sell this information to advertisers. Usually when you visit any major website, thousands of lines of JavaScript run behind the scenes, doing all kinds of things that you do not see.
Back to our webpage, instead of using document.write(), we can use the alert() command that we showed earlier:

Now, if we reload the webpage:
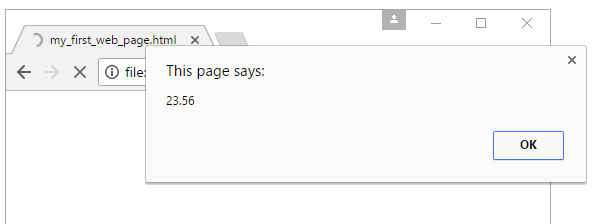
Above, a dialog box opens up that shows the result of Math.sqrt(555).toFixed(2). If the user clicks OK, the dialog box closes and they will then see the document in its normal state:
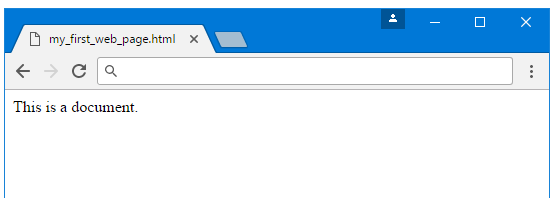
We can show multiple alerts to users. For example:

Now, if we reload the webpage, this is what happens:
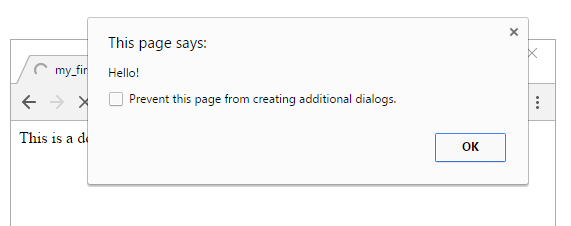
If we press OK, we are shown the second alert:
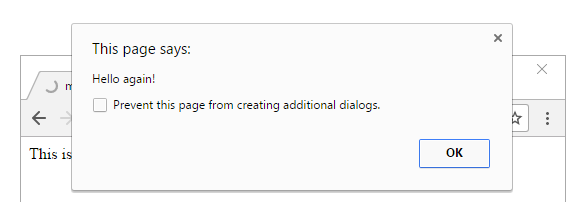
By using multiple alerts website owners can cause serious annoyances to their users, for this reason web browsers such as Google Chrome allow the user to stop the alerts from showing up for that particular web page by ticking the checkbox that says “Prevent this page…”, which is what you are seeing above.
Tinkering with JavaScript using JS Tinker
We can continue doing JavaScript by changing the webpage in Notepad then opening it again in a browser. But this can get tiresome. For this reason we will use a free learning environment known as JS Tinker to learn programming. This is a web-based program that can be accessed at various websites (just do a web search for “js tinker”), including my personal website.1 The program works inside the browser; there is no need to download or install anything. There are also other similar programs like JS Fiddle2 and CodePen3 that one can use.
Below is a screenshot of the JS Tinker program:
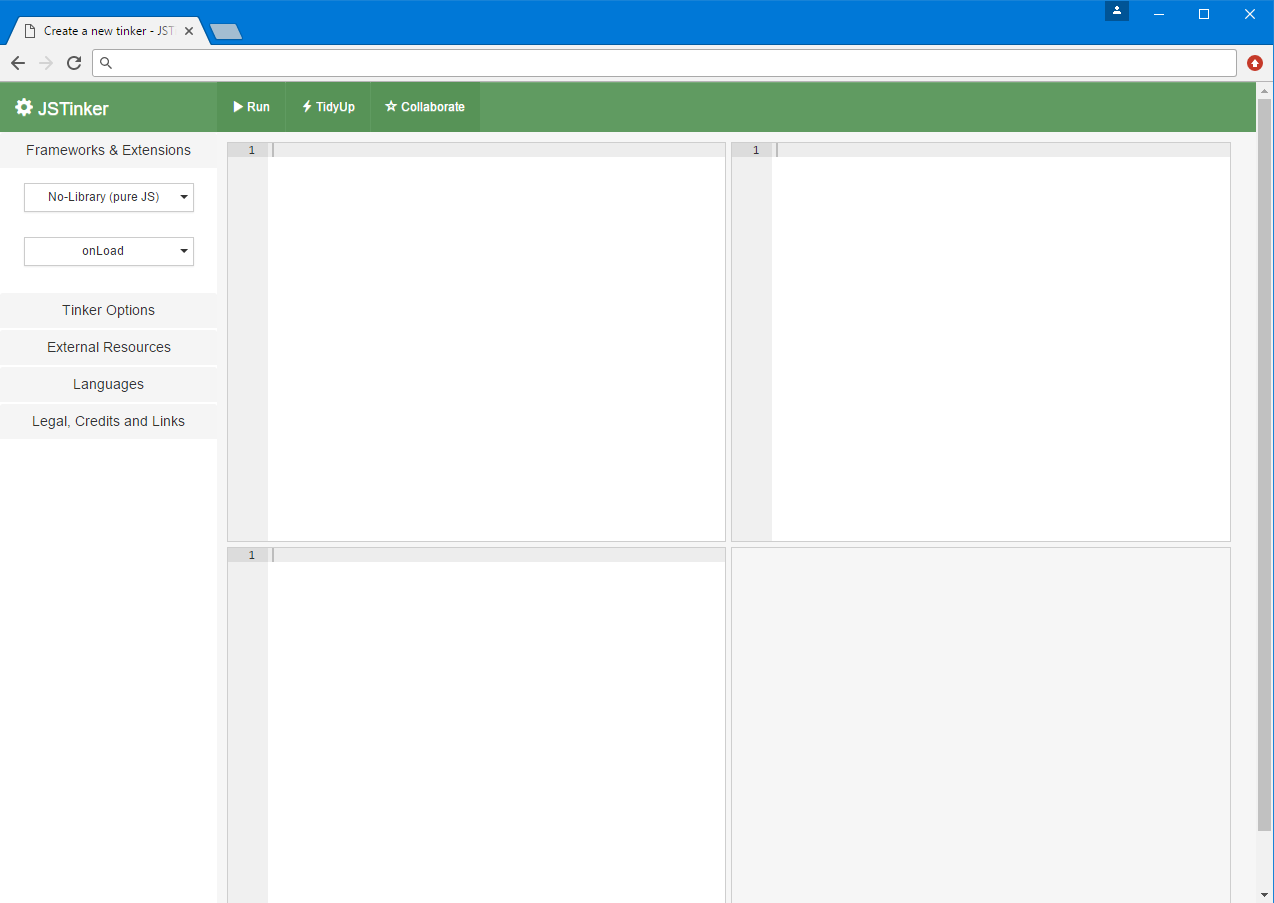
The program shows us four rectangular boxes. The top-left box is for HTML, the top right box for CSS (a language that we will not be using), and the bottom left is for JavaScript. The bottom right box displays the results. To clarify further, I will put a previous example inside the program:
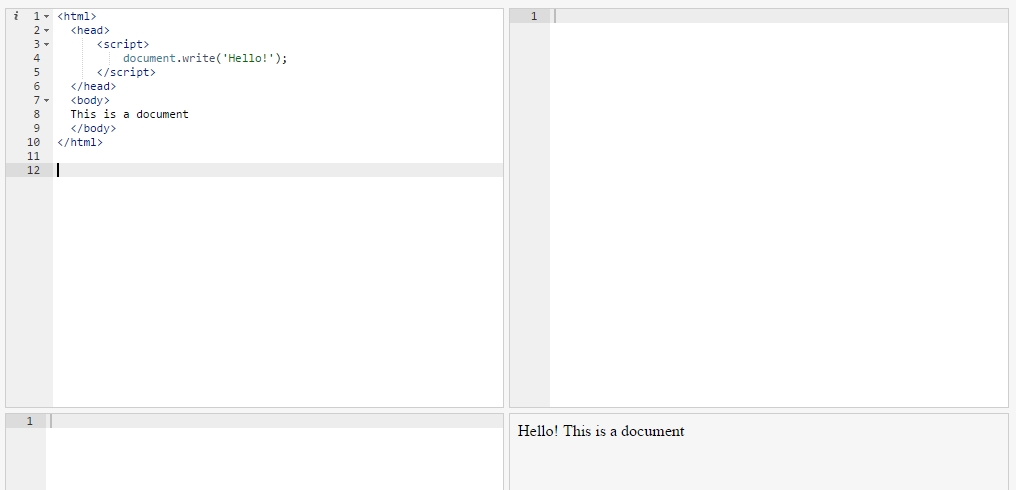
Above, the numbers you see on the left of the HTML box are added by JS Tinker and are not part of the code. They are merely there to help you know the line number of each line, which can be helpful when coding.
Above, I put the previous code in the HTML box, clicked the “Run” button at the top of the program, and this caused the program to print out the result in the bottom-right box. JS Tinker does the job of interpreting the HTML and JavaScript for us and displays the results. This helps us avoid the need of having to save the code in a file and open it again every time we want to make a change. We can change anything we want and click “Run” to immediately see the result.
Instead of having the JavaScript in the HTML box, we can move it to the JavaScript box as follows:
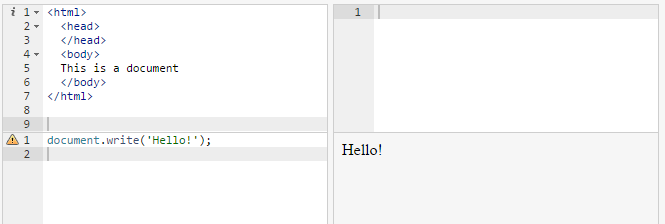
JS Tinker automatically merges the HTML and the JavaScript and displays the result. Due to the way that JS Tinker works, this merging causes document.write() to overwrite the entire contents of the document, which is why we no longer see “This is a document”.
In this book we will be putting the JavaScript inside the HTML box as we did in web page we created earlier. This is more convenient for our purposes and allows us to decide exactly where to print out what in the document.
2. Variables and Data Types
Now check out the HTML code below:

I have changed the JS Tinker program to only show the HTML box and the output box since that takes up less space for the purposes of this book. We will now replace the “x” with some JavaScript that actually calculates the length of the word and prints it out:

What we did above is inject some JavaScript into the sentence to make it dynamically print out the length of the word “king”. We can separate out the JavaScript from the rest of the text as follows on lines 6-8 of the code. This does not affect the result:

HTML ignores line breaks—regardless of how many blank lines we add, the result remains the same:

This is useful for us since it allows us to add JavaScript anywhere we like without worrying about breaking apart sentences and paragraphs. If we did want to add line breaks, we can always use tags like <br> in our HTML which is used for creating new lines (as will be shown).
The JavaScript we used to calculate the length of the word king is as follows:
document.write(‘king’.length);
Above, it does not matter whether you put “king” in single quotes or double quotes. But it must be in quotes.
The document.write() part, as you may recall, simply tells the browser to print out whatever is between the brackets. The interesting part of the code is ‘king’.length. If we remove the .length part, here is the result:

Above, the JavaScript merely prints out the word “king”. By using .length after ‘king’ (without any spaces, also notice the dot), we are telling the browser that we are not interested in the word “king” itself, we are only interested in its length. It literally means: ‘Access the “length” property of “king”’. When the computer does that, the result is 4, because the .length property, unsurprisingly, counts the length of the thing that comes before it. Since “king” is made up of 4 letters, its .length property is 4.
We should now clarify something. The JavaScript has no relationship with HTML outside of it. For example if in the HTML I change the word “king” to “elephant”, the JavaScript will continue thinking about the word “king”:

Above, the JavaScript code continues to count the length of “king”, because that is what we are telling it to do. The command document.write(‘king’.length); has a very specific meaning and has nothing to do with whatever might be outside the JavaScript.
To correct things, we have to change the word “king” to “elephant” inside the JavaScript too (line 7 below):

Now the correct length for “elephant” is shown. What if there was a way to write the word “elephant” only once, so that we could avoid having to update the JavaScript every time we update the HTML? In fact we can do that by using JavaScript.

Above, we are using JavaScript in two places. First we use it to print out the word “elephant” (line 6), then we used to print out the length of the word “elephant” (line 9). This so far hasn’t solved the problem, if you change the word “elephant” on line 6, line 9 will continue to print out the length of the word “elephant”. What we will do is use a variable to store the word we are interested in just once, then we will use the variable where we need to the next time:

Above, on line 6, I declared a variable called my_word. A variable acts as a container or box that you can put stuff inside so that you can access it later on. So on line 6 I declare that the browser should create a variable named my_word, and that inside it there should be the word “elephant”.
Let’s now look at line 6 closely:
var my_word = ‘elephant’;
In JavaScript, we declare variables using the keyword var. This tells the computer that we are making a new variable. The name we choose for the variable can be anything—it is merely a label. On line 7, we declare that the contents of the variable my_word should be printed out. The JavaScript command document.write() looks inside the container that we have named my_word and prints out its contents on the screen. Since on line 6 we placed the word ‘elephant’ inside the variable, on line 7 document.write() ends up printing out the word ‘elephant’.
But things do not stop there. On line 10, we declare that the length of the variable my_word should be printed out, and since my_word contains the word “elephant”, what ends up happening is that JavaScript prints out the length of the word “elephant”.
We can now change the word “elephant” to anything we want and JavaScript will correctly print out its length:

Note the semicolons we have placed at the end of every line of JavaScript. The semicolon declares that the JavaScript instruction right before it has ended. Without it, the computer thinks that the stuff on the next line is still a continuation of the same instruction, which causes the JavaScript to stop working correctly. JS Tinker is a smart program that automatically corrects some mistakes, therefore even if you leave out a semicolon things will often continue functioning normally. But in real-world JavaScript forgetting the semicolon can cause your JavaScript to stop working.
We may put multiple JavaScript instructions on the same line, as follows on line 6:

Above, I have merged the earlier lines 6 and 7 onto a single line 6. We can put any number of instructions on the same line as long as they are separated by semicolons. Here we can see the importance of semicolons. Below, I have removed the semicolon after “xylophone”:

The result is that the document.write() instruction that comes after it ends up doing nothing, so that the variable is not printed out (in the output on the right, see the way the word “xylophone” no longer appears).
As already mentioned, we can name our variables anything we want:

Above, I have changed the variable name from my_word to interesting_word. It does not affect the result of the code.
We can declare multiple variables in JavaScript with a single statement (in JavaScript a statement is anything that ends in a semicolon. Above I referred to statements as instructions, since statements are instructions to the computer. But the word “statement” is the correct technical term).

In the above code block, we declare two variables, cat_sound and dog_sound. Notice that at the end of the line for the sound of cats, we do not have a semicolon but a comma. This tells JavaScript that we have another variable to declare. Once we are done declaring all of our variables, we use the semicolon.
The above code block is the same as the following in its meaning:

Above, we use two separate statements, each of them ending in a semicolon. It is a matter of preference which one you use. The earlier method requires less typing since you have to type var only once.
Below we go about making use of the variables:

Above, we use three separate JavaScript code blocks. In the first one, we merely declare the variables without doing anything with them. We use HTML to print out the word “Cats”, then the JavaScript code block prints out the value of the cat_sound variable. The same is done for the dog sound.
If we write out the same JavaScript statement multiple times, it will be carried out multiple times, as follows on lines 11-13:
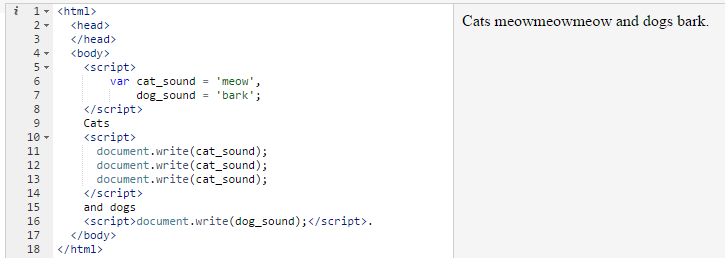
Above, on lines 11-13 we have the same statement printing out the cat sound, so that on right-hand side we see “meowmeowmeow” being printed out. There are no spaces between the “meow”s because we have not told JavaScript to put spaces between them. We can do so as follows:

On lines 12 and 14, I have added the statements document.write(‘ ‘);. The stuff inside document.write() may look strange, but it is merely a space with single quotes on each side of it. It is telling JavaScript to print out a space.
We can accomplish the same effect by using a single document.write() command through the use of concatenation, as follows:

Above, on line 11 we are using the plus sign to combine different pieces of text together. We are combining a cat sound with a space, and combining that with another cat sound, with another space, with another cat sound, then printing out the result.
The plus sign is known as an “operator” in programming. It performs operations on the thing or things that are before and after it.
Below we have a new example that we will use to showcase some more concatenation. On line 2 we declare a variable by the name of fruit, then on line 3 we write out its contents. The result is that we see the word ‘apple’ on the little preview area on the right-hand side:

Above, to simplify the code, I have only included the <script> tag. I skipped the <html>, <head> and <body> tags because they are not strictly necessary for our purposes. JS Tinker automatically adds them behind the scenes. The above example is the same as if we had typed out the following:

Below I have added a bit of additional code to the document.write() statement:

On line 3, we have the text that says ‘the word ‘ concatenated with the variable fruit using the + operator.
Below, I have placed an illustration of the way the above code works behind the scenes:
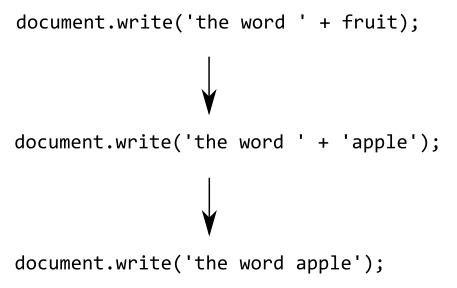
At the second stage above, the variable fruit has been “evaluated” by the browser, meaning that its contents have been extracted in order to be used in an operation. The operation is concatenation, the result of which can be seen at the last stage.
Notice the way there is a space after “word” and before the single quotation mark in ‘the word ‘ on line 3. That is necessary in order to show a space between “the word” and “apple” in the output. Here is what happens if we remove the space after “word”:

Above, “word” and “apple” merge together because we have not told JavaScript to create a space between them. We can add a space either by adding a space after “word”, or as follows:

Above, we are explicitly adding a space between the two bits of text. In many cases JavaScript ignores any space or new line inside the code, so if we separate out the stuff inside document.write() onto their own lines, this does not change anything:

Above, the closing bracket for document.write() has been pushed all the way down to line 7. Any text you wish to print out must be enclosed in quotation marks—otherwise JavaScript will think that it is a JavaScript instruction. Below I have added the word “is” on line 7, but I have neglected to add the quotation marks:

We see no output in the preview area because the code has stopped working. JavaScript thinks we are trying to access a variable named is, which does not exist, so it makes the code crash.
Below, I have corrected the code by adding quotation marks around “is”:

Now the code is working, except that the word “apple” and “is” are merged together. This is something that you will run into time and again when concatenating text. To correct it, below I have added a space before “is”, but inside the quotation mark:

Adding spaces outside the quotation mark has no effect, as follows on line 7 where I have added a few spaces after the + operator:

The reason is that, as has been mentioned, JavaScript ignores spaces inside its code, unless the space is part of a piece of text enclosed in quotation marks.
Below we have added some additional detail to our code:

On line 8, I use fruit.length to get the length of the contents of the variable fruit. Let’s now talk about what fruit.length really means. As you now know, fruit is the name of a variable we declared on line 2. As for length, it is a property of the variable fruit that tells us how many letters the variable contains. The dot between them tells JavaScript that what comes after is a property of what comes before it.
Data types
In programming, we have various “data types” that we use for storing information. The main data types we run into are strings and numbers. We have already used strings. So far I have called them “text”. A string in JavaScript is the stuff enclosed inside quotation marks, for example ‘apple’ below:

Above, on line 2, we have a string variable named fruit. It contains the string ‘apple’. We also have a number variable named year. It contains the number 2018. Note the way 2018 does not have quotation marks around it.
We have different data types in programming because some things only make sense when applied to strings, other things only when applied to numbers. The way the computer stores one data type behind the scenes is completely different from the way it stores another data type, and this can make all the difference in the world in the way a program works and how fast it runs.
Below we have an example of a bit of nonsense; we are trying to divide a string by 2018:

When we try to divide ‘apple’ by 2018 using the slash on line 4 inside document.write(), the result is NaN which means “not a number”. When you see NaN, it means you are trying to do something that does not make sense in JavaScript.
In JavaScript, as seen above, the forward slash (/) is used for division. Below we divide the year variable by 2, resulting in 1009:

The length property we spoke of earlier only works on strings (and arrays and objects, which will be discussed later). It does not work on numbers:

Above I try to access a supposed length property of the year variable, but the result is undefined. The reason is that JavaScript does not have a length property for numbers, so when we try to access it, JavaScript tells us it is not defined.
In the following example, we have a string variable named fruit with the string ‘apple’ inside it. We also have a number variable named x with the number 1000 inside it.

Above, on line 4 we are concatenating the two variables. Unlike with division, this does not lead to an error. JavaScript converts the number to a string, and then concatenates it with ‘apple’ to result in apple1000. It is the context that determines whether we will get an error or not. Dividing a string by a number does not make sense, so it results in an error. But adding a string to a number can be made to make sense. It is a little strange and can confuse people, but this is how JavaScript works. In other languages, such as C, you get an error if you try to add a string and a number. But languages like JavaScript try to be clever and guess what you were trying to do.
Below, I have added a new number variable on line 4 named y with the number 2000 inside it:

On line 5, I use the plus operator to add x and y. Since both of them are numbers, JavaScript performs mathematical addition, resulting in the number 3000, which is the sum of 1000 and 2000. It is the context that determines what the plus operator will do. If it is dealing with strings, it concatenates the strings together. If it is dealing with numbers, it performs addition. If it is dealing with a mix of strings and numbers, it concatenates them as if they were all strings.
Since both x and y are numbers, we can do division on them without this leading to an error, as follows on line 5:

Moving on, below on line 5 I have created a new variable named result. Instead of putting a number or string directly inside it, what I put inside is x / y. What this means is that JavaScript will perform this operation and then put the results inside the variable:

On line 6, I print out the contents of result , which as you might expect, is whatever we get when we divide the contents of x by y (0.5).
We can use the same variable multiple times in the same calculation. On line 5 below, we add x to x, then add that to y, resulting in the number 4000:

Below, on line 5 I do the same calculation as the one above, but on line 6, in a new statement, I do a different calculation and assign the results to the result variable:

What happens is that on line 5 the result variable ends up containing the number 4000. But the next statement overwrites the variable, causing it to contain the result of x + 1.
Below, I overwrite the variable another time on line 7, causing it to become a string:

JavaScript does not care that the result variable used to contain a number in the past. When we declare on line 7 that it should contain the string ‘banana’, that is what happens. The results of the previous calculations are discarded, and the result variable goes from being a number to a string.
Some languages do not let you do such a thing, if you try to put a number inside a variable that used to contain a string or vice versa, you will get an error. But in JavaScript you can do this. Languages that allow such a thing are known as dynamically typed languages; the data types are “dynamic”, in one statement a variable might be a string, then the next operation might turn it into a number. Other languages use static typing, in such languages trying to put a string inside a number variable causes the program to crash.
Interpolation
The presence of a mix of strings and numbers causes JavaScript to make a guess about whether to treat everything as numbers or as strings. Let’s take a look at the following:

Above, since the first operand in the operation is a string (the string ‘a’, JavaScript treats the entire operation as a string operation. It treats the numbers 500 and 500 as strings, instead of doing mathematical addition on them, it merely puts them side-by-side, performing string concatenation.
Below, we have reversed the order of the operation:

Strangely, JavaScript now performs mathematical addition on the numbers, resulting in the number 1000, then it performs concatenation. The reason is that in JavaScript the order of operations goes from left to right, the same as in mathematics.
Since division, multiplication and subtraction are always mathematical, they are only allowed on numbers. For instance, let’s look at the following:

The same happens if we use the minus sign:

But if we multiply 500 by 500, then use the plus sign to add that to a string, things work, due to the fact that JavaScript performs operations from left to right one after another:

Variable names
Programming languages have rules for what names you can use for variables. You can use lowercase, uppercase and number characters. You may also use underscores. These are all valid variable names:
my_variable
my_Variable
myVariable
MyVariable
MyVariable1
_my_variable
The last example above actually starts with an underscore. That is perfectly valid. However, the first important rule to remember is that you cannot have numbers at the beginning of a variable name, so the following JavaScript statement is invalid:

You may not use dashes (i.e. the minus sign), spaces and most special characters (such as the percentage sign) in variable names either. You can use dollar signs, however.
For now, to avoid errors in the code you try, keep using alphabetic letters and underscores to avoid errors.
Checking errors
The piece of code below has an error in it that prevents it from working. But what is the error?

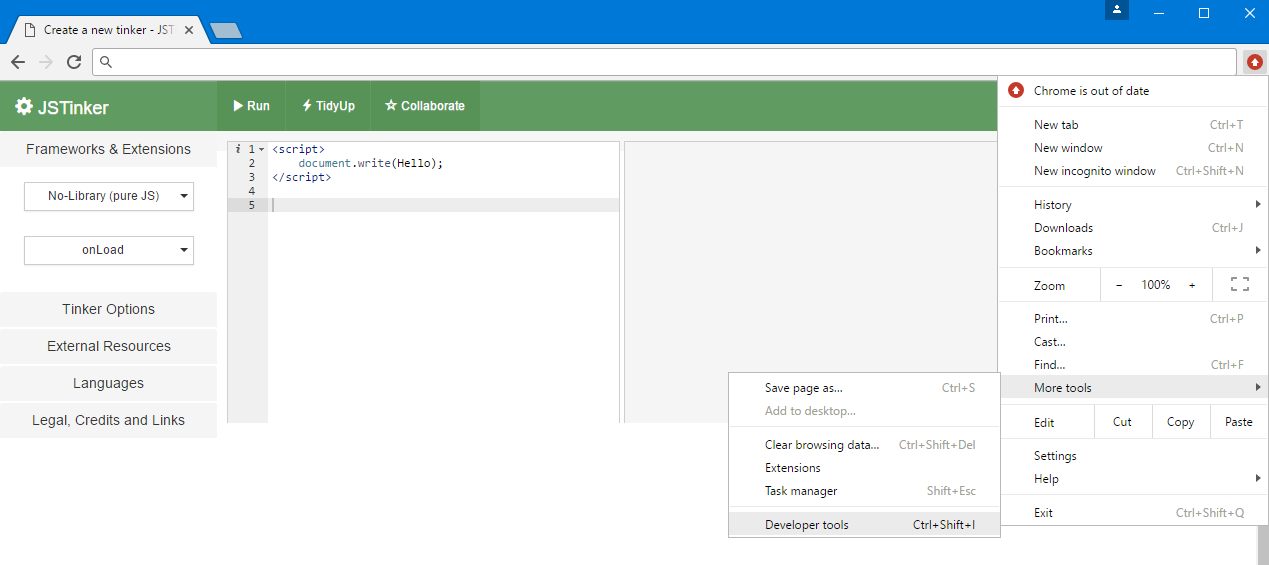
For a beginner to programming, it can be very difficult to find out why their code is not working. However, web browsers provide a useful “error console” that can sometimes help you find out what is wrong with your code. Below, there is a screenshot that shows how to access the error console in the Chrome web browser. In whatever browser you are using, go to the settings menu and find the “Developer tools” item (or something similar). In Chrome this option is actually hidden away, you have to click “More tools” first then you will see it:
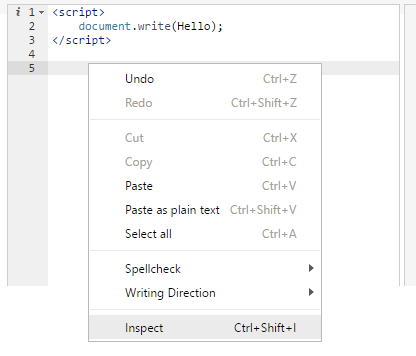
Another way of accessing the error console is to right-click on a blank area of the page and click “Inspect” (the bottom menu item below):
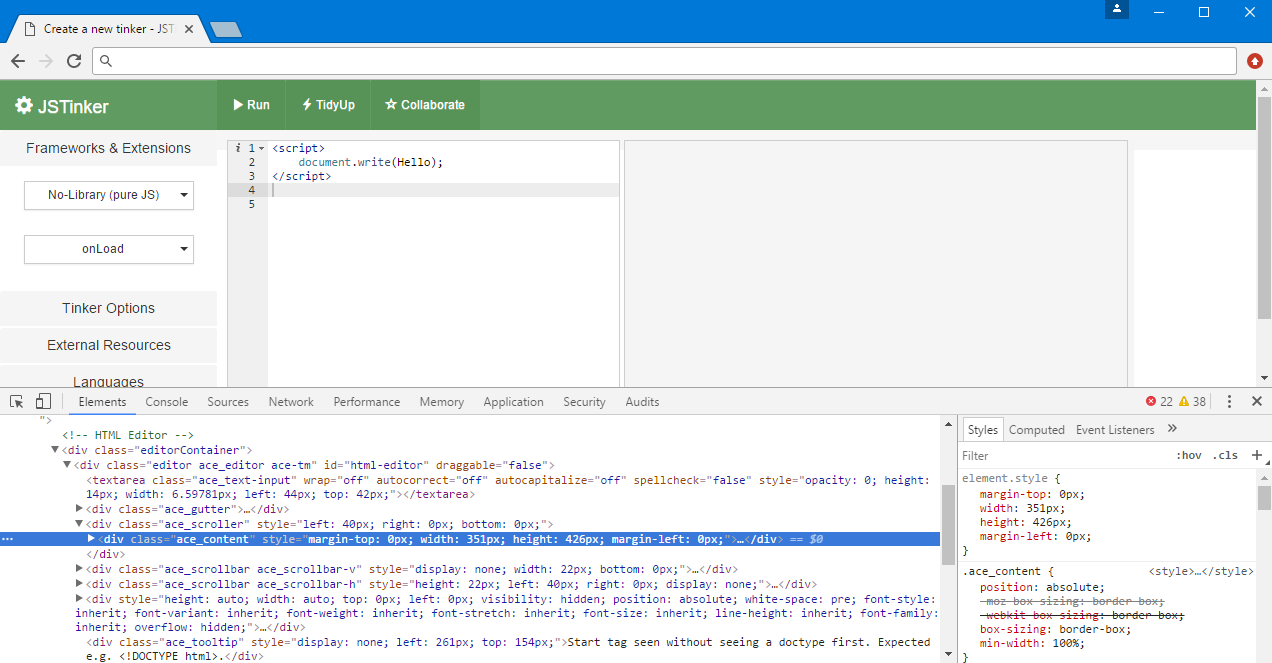
Once you do the above, the browser’s developer tools are displayed (see the bottom part of the following screenshot), which can be a bit overwhelming at first:
In the developer tools, click the “Console” tab to view JavaScript errors and certain other errors:
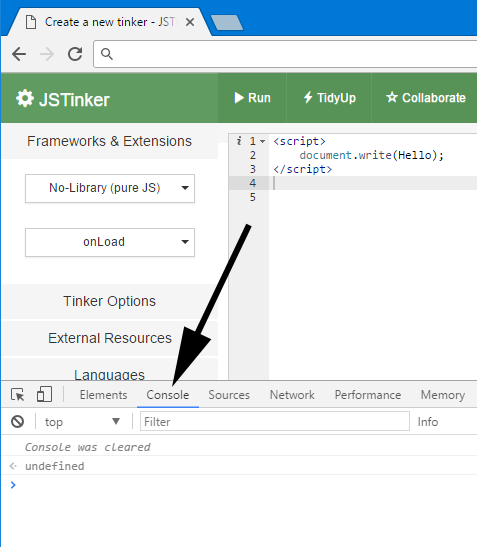
Now, if I click “Run” in JS Tinker to run the erroneous code shown earlier, here is what the console shows:

While the error messages that the console shows are not always very helpful (especially to beginners), when your code does not act as expected it can be helpful to take a look at the console. Above, the important part of the error message is “Hello is not defined”. This tells us that JavaScript was trying to access a variable named Hello but failed because the variable was not declared. Let’s take a look at the bad code again:

In this simple piece of code, we are not dealing with any variables, so what is the console talking about? The problem with the code is that we forgot to put quotation marks before and after the word “Hello”, so JavaScript thinks Hello is a variable name. To correct the problem, below I have added the necessary quotation marks:

Now the code is working without issue.
Below we have a different example of erroneous code:

When running the above code, this is what the console tells us:

The error this time is “Invalid or unexpected token”, which is a generic error message that tells us we have written nonsensical or bad JavaScript. In the above case, the issue is that the variable name 1st_name starts with a number, which is not allowed.
3. Repeated Action
The most important benefit of computers is their ability to perform the same action over and over again. A computer can find the sum of a million numbers in a few seconds, something that would have required a human many days of work.
In programming, we have many ways of telling the computer to perform some action a certain number of times, or to continuously perform it until it reaches some result or condition. Starting from the simplest examples, we will slowly learn how to build complex algorithms. Below, we have the word “hello” inside the variable named the_word. Notice how in the preview area on the right we see nothing. That is because we do not have any document.write() statements telling the computer to output stuff.

Now, imagine if for some strange reason your boss asked you to create a document with the word “hello” written in it 1000 times. Instead of spending half an hour typing or copying and pasting, you can do it in a few seconds by writing a bit of JavaScript. We have already seen that we can do the same thing over and over again by repeatedly writing the same statement, as follows:

But writing or copying the JavaScript statement document.write(the_word); a thousand times is not the smartest way of achieving our goal. Instead, we will use a loop. A loop in programming is a piece of code that the computer runs over and over again. There are multiple types of loops in JavaScript. We will look at a while loop first:

Above, you see the complete code for writing out the word “hello” 1000 times. We will spend some time deconstructing it. In the preview areas we see the word “hello” four times. The text actually goes on, extending rightward, until 1000 “hello”s are printed, but there isn’t sufficient space to show them all on this page.
In order to print exactly 1000 “hello”s, we need a way of keeping track of how many we have already printed. We do that using the number_of_hellos_printed_so_far variable declared on line 2. We first set it to zero, since on line 2 we have not printed anything so far. We next have the while loop. The basic structure of a while loop is as follows:

It basically tells the computer: As long as this condition applies, continually run the code below over and over again. The code that the while loop should run is enclosed in curly braces. These braces {} tell the while loop where it starts and where it ends.
In our example, the condition we have says that as long the value of the number_of_hellos_printed_so_far variable is less than 1000 (notice the mathematical “less than” operator), the code inside the while loop should be repeatedly run over and over again.
When running a loop, what JavaScript does is that it carries out the statements inside the loop, then checks the condition again, then, if the condition is still true, it runs the code again.
Inside the while loop we have two statements. The first one (on line 5) prints out a “hello” using document.write(). The second statement, which takes up two lines (6 and 7) keeps track of how many “hello”s we have printed. I have broken a single statement into two lines only for readability’s sake. This:

is exactly the same as this:

We have line 7 slightly indented (it has slightly more spaces before it) to indicate to ourselves that this line continues from the one above it. The spaces do not do anything—they are merely for readability’s sake.
We keep track of how many “hello”s we have printed by updating the value of the number_of_hellos_printed_so_far variable. We add the number 1 to the value of the variable each time the loop runs. The very first time JavaScript runs the loop, the value of number_of_hellos_printed_so_far is zero as we declared on line 2. Then the statement on lines 6 and 7 add one to the value of the variable, so that the variable ends up containing the number 1. Once JavaScript finishes running one iteration of the loop (meaning running the code inside it once from top to bottom), it goes back to the top, checks the condition again, and if the condition is true, it then runs the code again. To refresh our memory, let’s take another loop at the code for our while loop:

Below we have a textual description of what JavaScript is thinking as it runs the loop each time. The numbers at the beginning of each line represent the line number of the code above:
4 (start of while loop). Is the value of the variable number_of_hellos_printed_so_far less than 1000? Yes.
5. Print out a “hello”.
6. Increase the value of number_of_hellos_printed_so_far by one. Go back to the top. (Now number_of_hellos_printed_so_far contains the number 1)
4. Is number_of_hellos_printed_so_far less than 1000? Yes.
5. Print out a “hello”.
6. Increase the value of number_of_hellos_printed_so_far by one. Go back to the top. (Now number_of_hellos_printed_so_far contains the number 2)
4. Is number_of_hellos_printed_so_far less than 1000? Yes.
5. Print out a “hello”.
6. Increase the value of number_of_hellos_printed_so_far by one. Go back to the top. (Now number_of_hellos_printed_so_far contains the number 3)
JavaScript will repeat the above thought process over and over again until it reaches the following, which represent the last two iterations of the loop:
4. Is number_of_hellos_printed_so_far less than 1000? Yes. (at this point number_of_hellos_printed_so_far has 999 inside it)
5. Print out a “hello”.
6. Increase the value of number_of_hellos_printed_so_far by one. Go back to the top. (Now number_of_hellos_printed_so_far contains the number 1000)
4. Is number_of_hellos_printed_so_far less than 1000 now? No. Since the condition is now false, we cannot continue. This is the end of the loop.
In the very last iteration of the loop, the variable number_of_hellos_printed_so_far ends up containing 1000. When JavaScript next tries out the code while(number_of_hellos_printed_so_far < 1000) {, it compares the value of number_of_hellos_printed_so_far with 1000 to find out if it is less than it or not. Since number_of_hellos_printed_so_far contains 1000, JavaScript is basically asking “Is 1000 less than 1000?”. Of course it is not, which means that the condition for the loop is no longer true, which means the loop should no longer be run. When the condition is no longer true, JavaScript skips the loop’s code and runs any code that comes after the loop.
Infinite loops
The while loop runs only as long as its condition is true. The following piece of code will run forever (do not try it on your computer):

Above, each time JavaScript prints out a “hello”, behind the scenes it asks the question “Is 5 equal to 5?”, and since the answer is always “Yes!” the loop keeps going without end. The weird three equal signs === between the two numbers is how we check for equality in JavaScript. Earlier we already saw how we check whether a variable is less than a certain number (using the mathematical “smaller than” sign, <). Here we are using the mathematical “is equal to” sign, which requires three equal signs in JavaScript for reasons that will become clear later on.
I recommend that you do not try out the code above because it creates what is known as an infinite loop, which can cause your browser to crash. An infinite loop is a loop whose condition is always true. It is similar to telling a robot, “Keep digging holes as long as water is wet”.
More while loops
Below we are trying to find out the result of continuously multiplying the number 500 by 2:

With each iteration of the loop we multiply my_number by 2 on line 4 and store the new result inside the same variable. This overwrites the variable’s previous value with the new one. On line 3, we have a condition in order to prevent an infinite loop. The condition tells JavaScript to run the loop as long as my_number is less than ten thousand. On line 6, we print out the final value of my_number in the preview area, which is 16000. In order to find out why the end result is 16000, we can tell JavaScript to print out the value of my_number with every iteration of the loop:

Above, every time the loop runs, on line 4 we print out the value of my_number which at first is 500 as seen at the top of the preview area. On line 5 we have something new. You do not need to understand what this line means; suffice it to say that it causes the next item to be printed on a new line. It basically means “start a new line at this point in the document”. This is why the numbers are neatly stacked on each other; we are telling JavaScript to make a new line for each iteration of the loop (its literal meaning is: create an HTML <br> tag at this point. The <br> tag in HTML creates new lines in the document.)
The best way to learn programming is to read code and try to make sense of it. This is why I provide numerous examples in which similar concepts are treated. Many educational books overwhelm you with technical details and specifications and leave you to learn on your own. My teaching method is quite different from that. I help you see the same concepts in action in many different contexts, helping you get a natural feel for the way programming works.
4. Conditionals and Comparisons
In programming, we often have a need to check whether a variable is this way or that way before we perform a certain operation on it.
Below, we are trying to develop a little program for a shopping website that checks whether the user is allowed to buy cigarettes or not based on their age. If they are allowed, the site would let them add cigarettes to their shopping cart, otherwise it will not. We will not actually build the complete code for the whole website’s shopping cart mechanism, since that requires very advanced code. We are simply looking at a very small section of such a website’s code.

Above, on line 2 we declare a variable named user_age with the number 28 inside it. In a real program the user age will be dynamically retrieved from a database, but that is a topic for another day. Here we are manually setting it to 28 for the sake of the example.
On line 3, declare variable named can_purchase_cigarettes with the value false inside it. This variable is neither a string nor a number. It is a boolean. Boolean variables, named after the self-taught English mathematician George Boole (died 1864), can only contain the values true or false. Note how there are no quotation marks around the word false on line 3. If it had quotations, it would merely be a string variable with the word “false” inside it. But when we omit the quotation marks, we are declaring a boolean variable.
At this point in your learning it may seem strange that there is a whole type of variable dedicated to truth and falsehood, but as you progress, you will see that boolean variables are an essential part of programming.
On line 3, by declaring can_purchase_cigarettes to be false, we are assuming that no one can purchase cigarettes unless it can be proved that they can do so in the lines that follow. On line 4 we have an if statement. Similar to the while statement, the if takes a condition between brackets and has a bunch of code between its curly braces. As you know, JavaScript ignores whitespace, so below is a completely functional if statement:

Above, we are telling JavaScript to print out a “Yes!” if one is less than two. Since one is truly less than two, when the code runs, “Yes!” will be printed out in the document. There is no need to have a semicolon at the end of the curly braces (at the very end of the line above), because in JavaScript code blocks do not need semicolons to tell JavaScript the block is finished. The presence of the closing curly brace is sufficient for JavaScript know that this block of code is done. A code block is the stuff in curly braces and can be made up of multiple lines of code as we have seen in the previous examples.
The while statement is designed to run a block of code a number of times. The if statement, on the other hand, is designed to run the block of code just once, and only if the condition is true. If the condition is false, the block of code is ignored and JavaScript goes on running anything else that comes afterwards.
Let’s take another look at the example we were working on earlier:

On line 4, we are checking whether the user_age variable is greater or equal to 18. In JavaScript, >= means “greater or equal to”. The greater sign has to be written first, then the equal sign (if you write => , this has a completely different meaning and has nothing to do with comparison).
In the if statement’s code block, we are setting the value of the can_purchase_cigarettes variable to true on line 5. Since this code runs only if the condition on line 4 is true, what this means is that this variable only gets set to true if the user’s age is 18 or more.
Now we can add some output to our example:
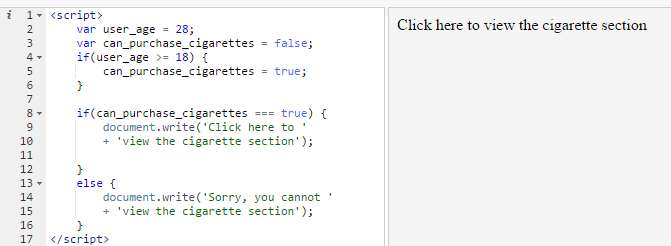
Above, we have added a new section of code starting from line 8. In this section of code, we are telling JavaScript to print out “Click here to view the cigarette section”, but only if the value of can_purchase_cigarettes is true. In the preview on the right, you see that the “Click here…” message was printed out. That is because on line 5 we set the value of can_purchase_cigarettes to true. Since the condition on line 8 is satisfied, the code underneath it runs. If you click on the message that says “Click here…”, nothing actually happens right now since more code is needed to turn the message into something interactive. But we are not adding that code to keep the example simple.
On line 13 we have something new. It is an else statement. The else statement is the companion of the if statement. You do not always need it, but it is handy when you do need it. In the else statement’s code block we write the code that we want to be executed when the if statement’s condition is not satisfied. We are saying: If the user can purchase cigarettes then do this, but if not, do this other thing in the else section.
Above, the else statement does not do anything because the if statement’s condition is true. We can make the else statement run by setting the user_age variable to something less than 18, such as 17:
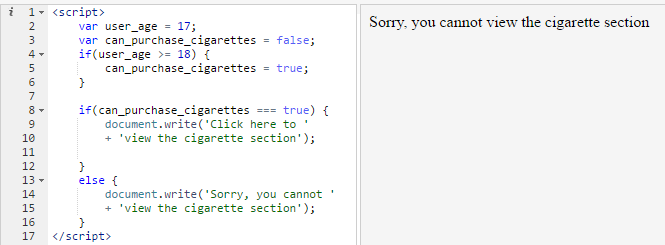
Above, the code is exactly the same as before except for line 2, where we declare that user_age is 17. By changing line 2, we cause a whole cascade of effects on the rest of the program: The if statement on line 4 no longer runs since when JavaScript checks whether user_age is greater or equal to 18 behind the scenes, the answer is “No!”. And this means that the code on line 5 is not executed, so that the value of can_purchase_cigarettes continues to be false because we declared it as false on line 3.
On line 8, we check if the variable can_purchase_cigarettes has the boolean value true. Since it does not, JavaScript ignores the if statement’s code and jumps immediately to the else section. In the else section, we print out a message that tells the user they cannot view the cigarette section, and this is what we now see in the preview.
Multi-condition statements
We will now move on to a different example. In demographics, a country’s “working age” population is defined as the population of people between the ages of 15 and 64. Below, we write a piece of code that decides whether someone is within the demographic working age or not based on their age.

Above, the first two lines of code are simple. We have a variable with a person’s age inside it, and another variable that keeps track of whether this person is within the demographic working age range or not. By default, we set this variable to false.
On line 5, we have an if statement with multiple conditions, which is something new. We have to check if the user’s age is at least 15 and at most 64. The double ampersand (&&) in JavaScript is used to mean “and” in conditionals. We use it when we want to ensure that the condition on both left and right of it are both true at the same time. In our example, the first condition is user_age >= 15, which is true, since the age is 17, which is greater than 15. The second condition is user_age <= 64, (<= means “less than or equal to”), which is also true, since the user_age is 17, which is less than 64. On line 6 we set is_in_demographic_working_age to true if both conditions are met. In the next if statement on lines 9 to 12, we print out a message if the user is within the demographic working age.
Brackets
In programming, as in mathematics, we can use brackets to ensure that things happen in a certain order.
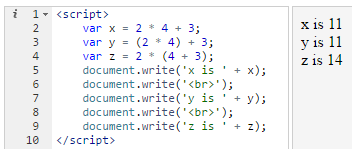
Above, we declare three variables and later print out their values. On lines 3 and 4 we add brackets into the calculation at different places. On line 3, we put 2 * 4 between brackets, telling JavaScript to perform this multiplication before adding the 3 at the end. Since this is what JavaScript would have done anyway whether we told it to or not, these brackets make no difference; the value of x and y is the same. On line 4, however, we add brackets between 4 + 3. This makes a difference because now JavaScript carries out this addition operation before the multiplication. The result is that z ends up containing the number 14, since two times seven is fourteen.
“Or” conditions
We have already seen the double ampersand (&&) which is used to mean “and” in JavaScript conditionals. We also have the double pipe (||) which is used to mean “or”. You type the pipe character by holding down Shift and pressing the backslash key on most keyboards.
In the following example, we have an imaginary school’s website that parents, teachers and students can all use. The user_type variable keeps track of the type of user who is currently using the system. Sometimes there is a need to prevent students from seeing parts of the system that teachers and parents are allowed to see. Below, we implement the logic of how this should be done:
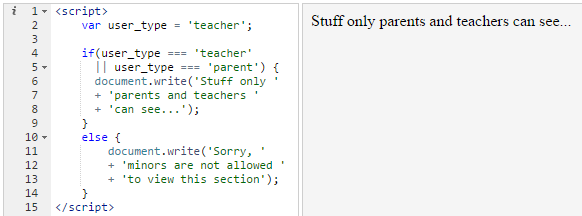
Above, we have broken the if statement’s condition onto two lines (lines 4 and 5) to make it take up less space in the screenshot. Lines 4 and 5 have the exact same meaning as this:

The if statement’s condition says that if the user is a teacher or a parent, then do the stuff that follows. Since we declared the user_type as ‘teacher’ on line 2, we see that the if statement runs and prints out the message “Stuff only parents and teachers can see…”.
If we change the user’s type to “parent” on line 2, the same message is still shown:
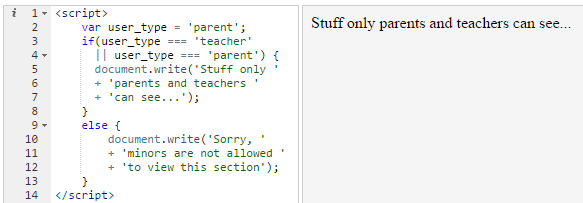
When JavaScript evaluates (i.e. runs or executes) the condition in the if statement, it first checks the left side of the condition: user_type === ‘teacher’. This condition fails, since the user type does not equal “teacher”. Since we are using the double pipe between the two conditions, JavaScript evaluates the condition on the right-hand side of the pipe: user_type === ‘parent’. This condition does not fail, because the user type is indeed “parent”. Therefore even though the first condition fails, since the second one succeeds, JavaScript executes the code inside the if statement’s curly braces.
If we now change the user type to “student”, the code of the else statement ends up running:

Now, we see the message “Sorry, minors are not allowed…”.
Not equals
We have already seen that we can use the triple equal sign to check whether something is equal to something or not. We also have the “not equals” sign in programming:

Above, we use JavaScript’s “is not equal to” sign, which is an exclamation mark followed by two equal signs (!==) to check that number is not equal to 6. Since number contains the number 5, it really is not equal to six, therefore the condition is true and the code inside the if statement runs.
We often have multiple ways of achieving the same thing when programming. For example, below we rephrase the above code so that it no longer needs a “not equals” sign:

On line 3 above, we are saying that number should be either smaller than 6 or greater, which means that it should not be equal to six.
5. Further Loops
We have already looked at while loops, used for making JavaScript repeatedly do something. There are other types of loops that we use in programming, one of which is the for loop. But before we talk about for loops, we have to talk about incrementing and decrementing.
If you have a variable with a number inside it, such as 5, you can increase its value by 1 (to make it 6) as follows:

Above, even though we assign the number 5 to my_number on line 2, since we add one to it and assign the result back to the variable on line 3, the number 6 gets printed out in the preview area.
JavaScript provides us with a shorthand for doing this, as follows:

The meaning of the above code is the same as before, but we are now using the increment operator (two plus signs without spaces). When we put ++ after a variable name, we tell JavaScript to increase the variable’s value by one. Behind the scenes, JavaScript checks the variable’s value (which in the above example is the number 5), finds out the result of increasing it by one (which is the number 6), then changes the variable by putting the new number inside it.
We also have the decrement operator which is made up of two minus signs. This operator decreases a variable’s value by one:

Above, the number 4 gets printed out because on line 3 we use the decrement operator to decrease the value of my_number by one. Note that on line 3 we have a semicolon at the end. This is necessary since my_number– is a complete statement and needs to be terminated by a semicolon like any other statement.
For loops
Below is an example of a very simple for loop:

In the above block of code, we tell JavaScript to print out “Hello” four times. To understand what is going on, let’s examine the stuff on line 2 in detail. After the for, we have brackets that contain three sections of code, like this:
for(section 1 ; section 2 ; section 3)
Each section is separated from the others by a semicolon. In the first section, we declare a variable we want to use to control how many times the loop will run. This first section is a simple variable declaration like we have already seen numerous times:
var i = 1;
The variable is named i. It is common practice to name this variable i, but it can be named anything else we want.
In the second section, we declare the condition that JavaScript should check with every iteration of the loop (each time the code of the loop runs). The condition we have provided above is i < 5. This means that the loop should run as long as the value of the variable i is less than five.
In the third section, we give JavaScript a statement that should run with each iteration of the loop. This section is generally used to make a change to the value of i that affects whether the loop continues running or not. The statement we have given it is an increment statement: i++. This means that every time the loop runs, the value of i should be increased by one.
Let’s now take another look at our example for loop:

When JavaScript runs the above code, what takes place is that first it creates a variable named i. Then it checks whether the variable satisfies the condition i < 5. Since it does, JavaScript runs the code inside the for loop’s curly braces, so that a “Hello!” is printed out followed by a new line. Once JavaScript gets to the bottom of the for loop (once it gets to the closing curly brace), it runs the statement in the third section of the code on line 2, increasing the value of i by one, so that now i will have a value of 2 behind the scenes.
Then JavaScript goes back to the top of the loop, checks the condition on line 2 to see if it is still true (it checks whether two is less than five), then runs the code again, then at the end increases i by one, then jumps back to the top, and so on and so forth.
We can make use of the variable i inside the loop’s code. We can for example check what its value is with each iteration:
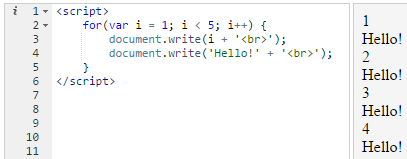
Let’s now check out a new example:
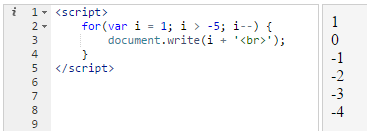
Above, we start out by declaring i to be 1. But the condition is now different, i > -5 means that the loop should run as long as i is greater than minus five. In the third section on line 2, we have i– (rather than i++). This means that we decrease the value of i by one with each iteration. The result, as you see, is that the value of i decreases each time until it reaches -4, at which point the loop finishes.
Similar to a while loop, for loops can lead to infinite loops that never finish running and that cause your browser to crash. Below is an example of an infinite for loop:

If the syntax of the for loop still seems mysterious and difficult to understand, this is perfectly fine. It will take much practice before it starts to make intuitive sense.
Moving on, below we have a for loop that uses neither the increment or decrement operator in the third section on line 2. It rather uses the new statement i = i * 2. This means that JavaScript should multiple the value of i with every iteration.
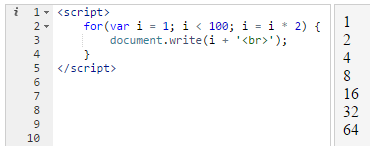
The result is obvious. JavaScript keeps doubling the value of i and printing it out until the condition i < 100 stops being true.
Anything you put in the third section of a for loop should be a complete JavaScript statement. If we had merely put i * 2, we would have caused an infinite loop:

Above, with each iteration, JavaScript multiplies i by two then throws away the result, since we do not have i = in front of it.
To understand this better, consider the following code:

A beginner might expect the code on line 3 to cause the value of i to become 2. But as you can see in the preview, when we print out the value of i on line 4, we get 1 rather than 2. The code on line 3 is actually useless, because it should be i = i * 2. If we merely write i * 2, this tells JavaScript to find out the result of i times two, but it does not tell it to do anything with the result, so JavaScript performs the calculation behind the scenes then throws away the result.
Never loops
A never loop is a loop that never runs. Below is an example:

On line 3, we tell JavaScript to continue running the loop as long as i is greater than 50. But since i is 1 at the beginning, the condition is false from the start, so the loop ends immediately without printing anything out.

Above, on line 3, we are saying the loop should run as long as my_number equals 1. But since on line 2 we have declared that my_number is zero, this condition is false from the start, so the code inside the while loop’s curly braces never runs. JavaScript simply ignores it and goes on to run any code that might be below it, as follows:

6. Functions
In programming, functions allow us to name a block of code and reuse it later on. Below is an example:

On lines 2-4, we define a function named newline(). The function name is followed by brackets for reasons that will become clear later on. After the brackets we have curly braces, then the actual code of the function. What this function does is that it prints out a new line. You see the function used on line 7. On line 6, we write out a line. On line 7 we call the newline function, and on line 8 we write out a second line.
A function name can be anything we want, similar to variable names, and similar to variable names, there are some characters you are not allowed to use in the name, such as dashes.
When we write newline(); on line 7, it is as if we had written document.write(‘<br>’);. Behind the scenes, every time JavaScript sees the statement newline(), it performs the action inside the newline function.
Below, we call the newline() function twice, causing two new lines to be printed out:
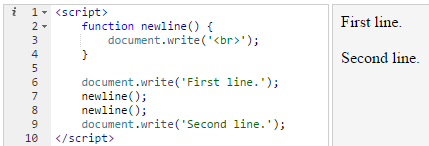
When we define the newline() function on lines 2-4, this does not cause anything to happen just yet. JavaScript stores the code inside the function until we call it. Above, we call the function twice, on lines 7 and 8.
If we remove the calls to newline(), the function will not do anything:

When you declare a function, you are telling JavaScript to hold this piece of code in memory until you have a need for it later on.
Below we have a little program that greets a user based on their language. If the user’s language is English, the program says “Hello”, while if the user’s language is French, it says “Bonjour”:
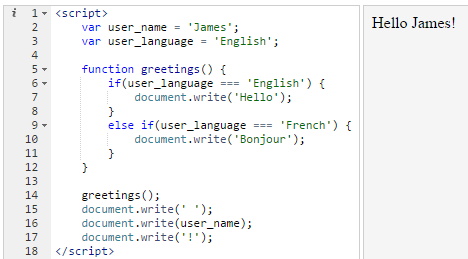
Inside the greetings() function on lines 5 to 12, we check the user_language variable, and based on its value, we either write out “Hello” or “Bonjour”. Above, you see the else if statement, which is used to check a condition once the condition before it proves to be false. We are telling JavaScript: If the language is English, then do this, but if the language is French, then do this other thing. We could have also added an else at the end to tell JavaScript what to do if the language is neither English nor French.
On lines 14-17, we start to actually write out some stuff. First, we call the greetings() function, which ends up writing out a “Hello”. Then we write out a space (line 15), the user’s name (line 16) and finally an exclamation mark (line 17).
Every time we call the greetings() function, JavaScript checks the user’s language to see whether it should write out a “Hello” or a “Bonjour”.
Below, we have the same code as above while adding some additional lines to it starting from line 20. We change the user_name variable to “Marcel” and we change the user_language to “French”.
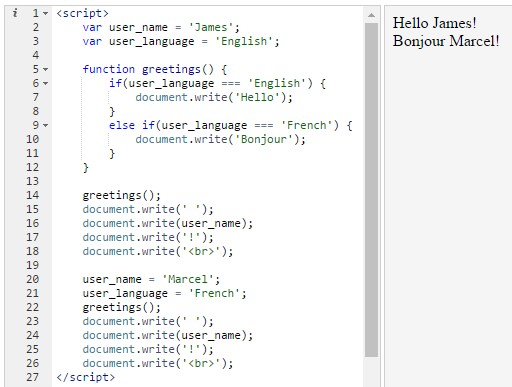
Above, on line 22 we have another call to the greetings() function, but note that this time it writes out a “Bonjour”, because we changed the user’s language on line 21 to French.
Moving on, below we have a different program that calculates an employee’s new salary based on their performance rating. The rating can either be A, B, or C.
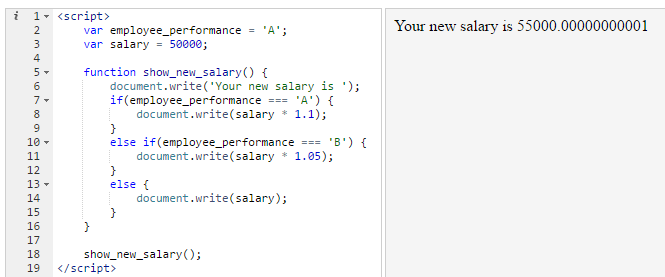
The show_new_salary() function writes out “Your new salary is ” followed by a number. If the employee_performance variable equals “A”, the salary is multiplied by 1.1, meaning it is increased by 10%. If the performance is “B”, it is instead multiplied by 1.05, meaning it is increased by only 5%. And if their performance is something else, no promotion is applied.
Since on line 2 we declared the performance as “A”, when we call show_new_salary() on line 18, the promotion on line 8 is applied and printed out, which is what you see in the preview area. The salary shown is 55000, a 10% increase over 50000.
You may notice that the salary shown is not exactly 55000, it is rather 55000.00000000001. That is caused by the way JavaScript performs calculations behind the scenes. JavaScript performs approximate calculations when doing things like multiplication and division, which result in strange results like the above. The root cause has to do with the way numbers are represented inside the computer’s memory. To avoid that, we have to use certain mathematical operations to round the resulting number to an integer:
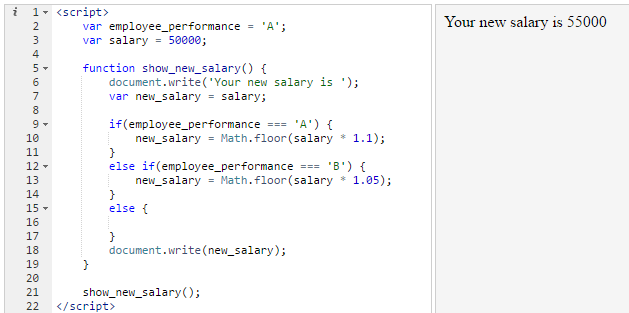
Above, I have made some changes to the show_new_salary() function. On line 7, I declare a new variable called new_salary and place inside it the number that is already inside salary. This means that we assume the new salary is the same as the old salary unless proven otherwise later on. Since the employee_performance is “A”, the code on line 10 runs. In this line of code, perform the same calculation as before by multiplying the salary by 1.1 to increase it by 10%. But this time we have enclosed the calculation between the Math.floor() function. The Math.floor() function is a built-in JavaScript function that rounds down a number with decimal points to an integer. It takes a number and shows us what the number is if we take away everything after the decimal point.
Finally, on line 18 we print out new_salary, which is 55000.
Notice that on line 16, the else statement is now empty. That is because there is nothing for the else statement to do anymore. Since on line 7 we assume that new_salary is the same as salary, if the performance is anything besides “A” or “B”, the new_salary will be the same as salary without any need for additional statements. Since the else statement is empty, we can remove it:

To illustrate that it is still functioning correctly, I will now change the performance to “C”:
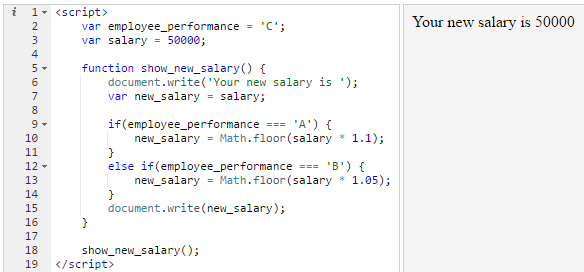
As you can see, the salary remains at 50000, because inside the show_new_salary() function JavaScript sets new_salary to salary on line 7, then checks whether the performance is “A” or “B”, and since it is not, it ends up writing out new_salary without making changes to it.
Below, after printing out the first employee’s new salary, we change the variables, presumably dealing with a different employee whose old salary is 75000 and whose performance is “A”:
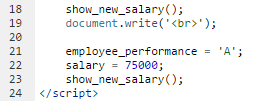
Here is the result:

Functions with inputs
In everyday programming, most functions take inputs, something our functions have not done so far. Math.floor() is an example of a function that takes inputs: you give it a number, it gives you a result.
Below, we have a function that doubles any number we give to it:

On line 2, we declare a function named double_this(). This function takes a variable called number. And it returns a variable named new_number. On line 7, we write out the result of double_this(50), which results in 100 being shown in the preview area.
Let’s now look at the function definition. A function definition is the term we use for the whole block of code in which we define a function, meaning lines 2-5 above. On line 2, inside the brackets we have the word number. This causes a variable to be created inside the function with the name of number. JavaScript automatically puts inside this variable anything we pass to the function when we make use of the function. Since on line 7 we pass the number 50 to the double_this() function, this causes the number variable to have 50 inside it.
On line 3, we declare a new variable named new_number, which has value of number multiplied by two. On line 4 we have something new, the return statement. In this statement we tell JavaScript what the function should return, meaning what the function should “print out” when we use it. Writing return new_number; means “whenever this function is called, give back new_number as the result”.
This can be a bit difficult for a beginner to understand. This is perfectly fine, since here we are dealing with a very complex part of programming. Once you have understood how functions work, you will have mastered the basics of programming.
To further clarify, below I have kept the function the same as before while changing the stuff after it. The meaning of the code is the same as before:

On line 8, I declare the variable my_doubled_number. The value we assign to this variable is the result of double_this(my_number). This tells JavaScript to put my_number inside the double_this() function, then put inside my_doubled_number whatever is returned by the function. Think of the function as a machine. Something goes in, something else comes out.
Doubling a number is not a very impressive mathematical operation. Let’s create a function that checks whether a number is odd or not:
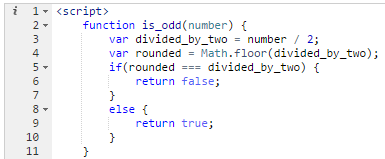
What we have inside the above function is an algorithm, a word named after the Persian mathematician al-Khwarizmi (died 850 CE). An algorithm is a step-by-step set of instructions for discovering the value of something. On line 2 of the function, we divide the number variable (the number the user is checking for oddness or evenness) by two. If it is an even number, the division will not lead to a decimal point (for example dividing 20 by two results in 10 without any decimals). While if it is an odd number, the result will contain stuff after the decimal point (for example, dividing 3 by 2 results in 1.5). We use this fact to detect whether a number is odd or even. On line 4, we round down the divided number to the nearest integer. If divided_by_two contains a whole number, rounding will have no effect on it (if we divided 20 by 2, the result would be 10, and rounding it would still give us 10). But if it contains a number with stuff after the decimals, rounding it would cause that stuff to be thrown away, so that the rounded number ends up being different from divided_by_two.
On line 5, we check whether rounding made a difference or not. If rounded is exactly the same as divided_by_two, it means rounding made no difference, which means divided_by_two had no fractional part, which means the number is even, therefore we return the boolean value of “false”, meaning number is not odd. In the else part, we return “true”, meaning number is odd. Below is an example of how we can make use of the is_odd() function:
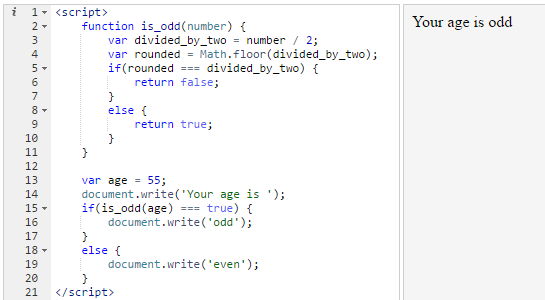
On line 15, is_odd(age) === true means “does the is_odd() function return true when you pass it the value of the age variable? JavaScript runs the is_odd() function by putting the number 55 into the number variable and performing the rest of the calculations. If on line 9 the value that is returned is true, then the code on line 16 runs. Otherwise the code on line 19 runs.
Below, we have a loop in which we use the is_odd() function to check whether the numbers from 1 to 9 are odd or even:
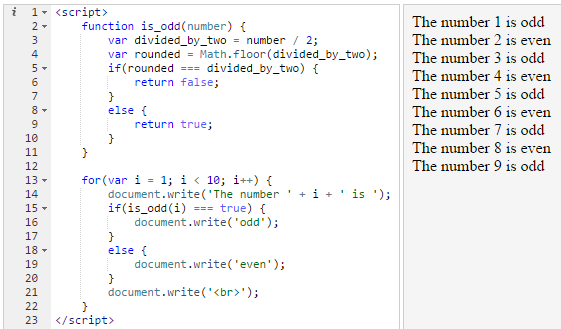
With each iteration of the loop, JavaScript passes the value of i to the is_odd() function on line 15, which determines whether the word “odd” will be printed out on line 16 or the word “even” on line 19. Before the end of each iteration, we print out a new line on line 21 so that the next line of text should start on a new line.
Moving on, we can make use of one function to build another function. For example, let’s say we want to make an is_even() function to check whether a number is even or odd. Instead of building a whole new function from scratch, we can make use of is_odd() from before:
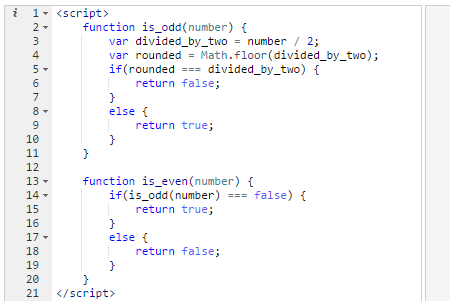
Above, we have the same code as before from lines 2-11. We then have the new is_even() function. This function merely checks whether a number is odd using the is_odd() function from before. If it is not odd, it returns true, otherwise it returns false. In this way, the is_even() function does not need to do any mathematical heavy lifting, it leaves it all to the is_odd() function.
Moving on, earlier we had the following example for calculating an employee’s new salary based on their performance:

The show_new_salary() function is not actually a good function in programming because it is making use of variables outside of it. If you move this function to a different web page, the function might fail miserably if someone forgets to declare the employee_performance and salary variables above it. In real-world programming, the code might go on for thousands of lines and you can never rely on some variable being available. To turn it into a good function, we have to turn it into a function that take the employee performance and salary as inputs, rather than accessing them randomly. Below is the improved example:
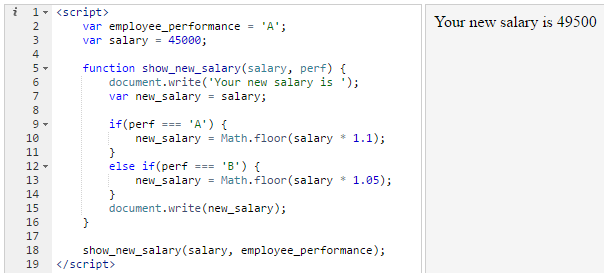
Above, we have changed the show_new_salary() function so that it now takes two inputs, as declared on line 5. The two inputs are separated by a comma. The first input is salary, the second is perf, short for performance. Everything else functions like before. On line 18, when using show_new_salary(), we now have to pass it the variables salary and employee_performance. The show_new_salary() function is now independent of the code that is outside of it. For example, we can rename the employee_performance variable on line 2 to performance, we also change the code on line 18 to say performance rather than employee_performance. Now the code continues working like before even though we made no changes at all to the show_new_salary() function:
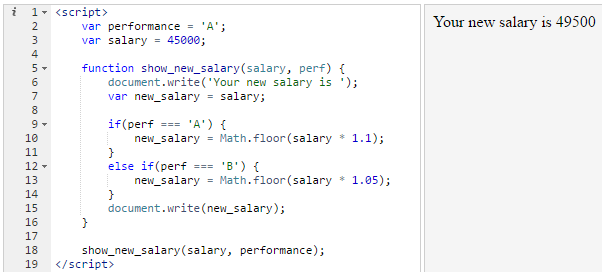
In the earlier, not-so-good example where the show_new_salary() function wasn’t taking inputs, if we had changed the names of the variables on lines 2 or 3, we would have also had to change the show_new_salary() function. But now that the function operates according to inputs, it does not care about the variable names outside of it. It operates in a separate universe of its own; it has become a machine that takes something and spits something out.
As it should be clear by now, the variable names inside the function are unrelated to those outside. Below we rename salary to pay inside the function:
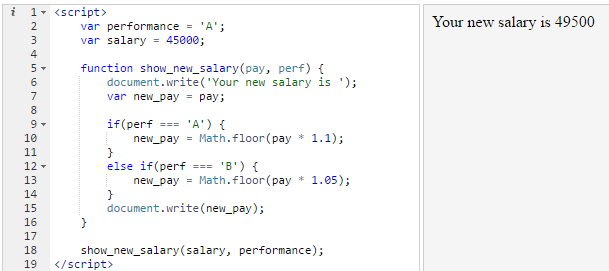
Above, everything continues functioning normally because the function does not care about the variable names outside. It only cares about what is passed to it by JavaScript. Whatever we pass to it on line 18 ends up inside the function’s pay and perf variables.
7. String Manipulation
Performing operations on strings is part of a programmer’s daily life. For this reason programming languages offer a vast array of functionality to help us work with strings. In the following example, we print out the first letter of the word “cat”:

On line 3, we use a special syntax that lets us access any character of a string by providing its place in the string. The meaning of word[0] is “the character in the word variable that is at position zero”. In programming, we often start counting up from zero rather than one, so position zero means the first character. Below, we change word[0] to word[1], which ends up printing the second character for the word variable (the letter “a” in “cat”):

Below we have an even simpler example:

When we write ‘Hello there!'[11], it means “get the character that is at position 11 of this string”, which happens to be the exclamation mark.
Changing case
Below, we use JavaScript’s built-in toUpperCase() function to capitalize a word:

The syntax ‘dog’.toUpperCase() is unusual because nothing is passed to the toUpperCase() function like you would expect. What we have here is a special syntax that we use when calling one of JavaScript’s build-in functions. The toUpperCase() function can only be used with strings, if you use it with a number you get an error.
The counterpart to toUpperCase() is toLowerCase(). Below we have the same code from above, but we print out a new line of text which is made up of the previous line turned to lowercase:

Moving on, below we have a function that capitalizes the first letter of any word passed to it. The example brings together much of what we have learned so far, therefore do not worry if at first it looks a bit overwhelming:
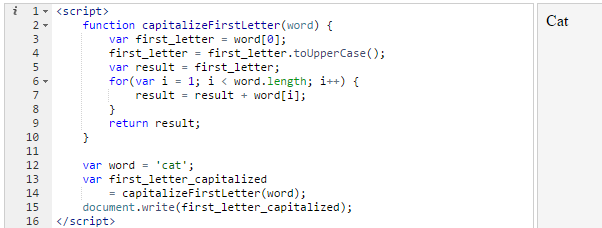
Try to read the code and guess how it works. You should try to do this with every example; the more code you read, the better you will get at understanding how it works. Since the code contains nothing new, I will only explain the interesting points of it. We have a for loop that we use to loop over every character of the word variable. We add the characters one by one to the result variable. Once the loop on lines 6-8 stops running, we have a return statement on line 11 that returns the result variable. Below, I have changed the word “cat” to “dinosaur” on line 14:
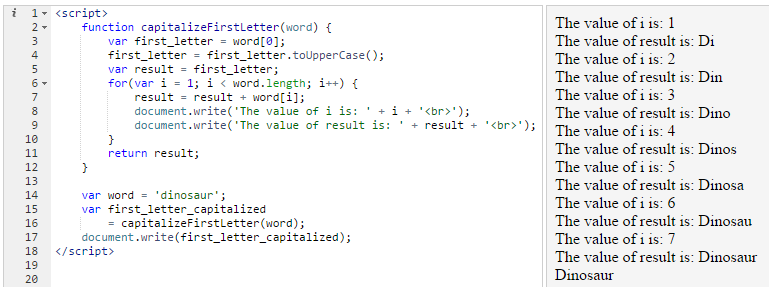
Thanks to the fact that in the for loop we tell JavaScript to run the loop as long as i is less than word.length, no matter what word we pass to the function, the loop always runs exactly the number of times needed.
An experienced programmer can shorten the capitalizeFirstLetter() to a single line, as follows:

Above, the part that says word.substring(1, word.length) uses the string-related substring() function to get all the characters inside the word variable except for its first one. The 1 we pass to it means “start at position 1” (rather than zero), and the word.length we pass to it as its second argument tells it how many characters to get. We are telling it to get everything from position 1 to position 8.
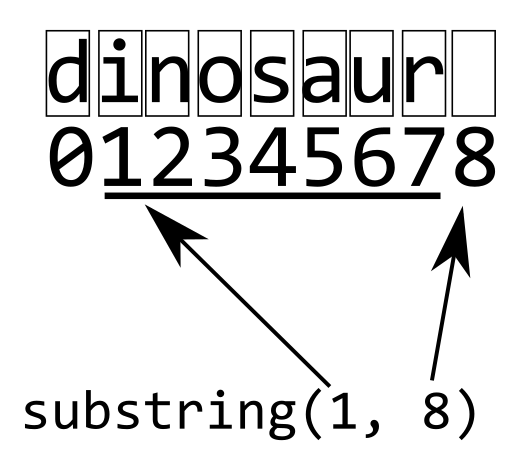
As beginners we sometimes feel tempted to write code like the above because it looks clever. It accomplishes so much in so little space. But clever code is not always good code, since readability matters. Writing a clever piece of code that is nearly impossible for others to understand is not good code, it is actually bad code; programmers often work in teams and other team members should be able to read your code and understand it easily instead of having to waste many minutes trying to decipher what the code is doing. The above is not too bad because what it is doing is relatively simple. But the more complicated the code is, the better it is to break it up into multiple statements to make it easier to understand.
Moving on, below we use the capitalizeFirstLetter() function twice in the same statement on lines 8 and 9 in order to capitalize the first letters of both the first_name and the second_name variables, so that each of “james” and “potter” becomes “James” and “Potter”:

Below we have a different example:

Above, only “james” ends up being capitalized because we are passing the “james potter” string all in one go to the capitalizeFirstLetter() function. The function capitalizes the first letter and returns everything after it unchanged. It does not care about any spaces there might be in the string, so we end up with “James potter”.
8. Arrays
We have already spoken of data types. We have strings, numbers and booleans. In this chapter we will cover a new data type known as an array.
If you think of an ordinary variable as a box that holds things, an array is a box that holds other boxes, which in turn hold things.
Below, we have declared an array named fruits with two string values inside it. An array is declared using square brackets [ ].

As can be seen on line 2, the two values placed inside the array are separated by a comma.
Below we access the values we placed inside the fruits array:

We already discussed the way you can access the first character of a string variable using [0], and the other characters using their appropriate index values. Arrays, like strings, can be accessed using similar index values. Above, on line 3 we write out the contents of fruits[0], which means “the value that is at index 0 of the array”. The result is that the word “apple” gets printed out. On line 5 we write out the word “orange” using fruits[1], because “orange” is at index 1.
Instead of printing out each value on a separate line of code, we can use a for loop to do the job for us in a few lines of code regardless of how long the array is (below I have added a third item to the array).

On line 4 we declare that the for loop should run as long as i is less then fruits.length. The length attribute returns the number of items in the array. If we were dealing with a string, length would return how many characters were inside the string. Below I have added a new statement on lines 5-7 that prints out the length of the array in the preview area:
In the for loop, since fruits.length is 3, the result is that we are practically telling the loop to run as long as the variable i is less than three. Since i starts at zero (because we wrote var i = 0 in the loop’s condition), this means that the loop will run three times. Each time, it will increase i by one (because we wrote i++ in the loop condition), and once it becomes three, the condition i < fruits.length ends up being false, so that loop ends. To illustrate, below on line 6 we print out the value of i during every loop:
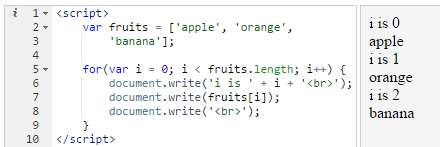
Once the value of i becomes 3, the condition i < fruits.length becomes false, since i will not be less than 3, it will be equal to 3.
Now, if we add many new items to the array, they will all get printed out without us having to make changes to the for loop:
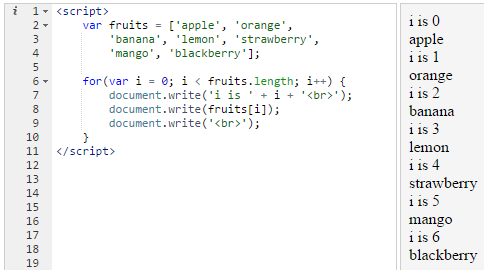
Above, on lines 3 and 4 we have added four new fruits to the fruits array, but on lines 6-10 we have the same loop as before. Since we have made the array larger, fruits.length now equals 7. This means that the loop will run seven times since on line 6, inside the loop condition, we are saying the loop should run as long as i is less than fruits.length, whatever fruits.length might be. Any items we add or remove from the array affect the value of fruits.length, which affects how many times the loop will run.
Array functions
Similar to strings, arrays have numerous functions that help programmers operate on them. The first function we will discuss is the toString() function4 which prints out everything inside the array as a string. This can be useful when you are not sure what is inside the array and you want to quickly take a look at its contents. Below we have an array named car_makers, which contains the names of three car companies.

Above, on line 5, we use car_makers.toString() to get the all of the contents of the array as one string.
We can chain multiple functions:

Above, on line 7, we first turn car_makers into a string, then use toUpperCase() to turn the string into an all-caps string.
Below, we go further, using the substring() string function to only get the word “TOYOTA”:

On line 8, we use the substring() function (covered in the chapter on strings) to extract everything in the string at indexes 0 to 6, which happens to be the word “TOYOTA”.
Note that the only reason we are able to use string functions like toUpperCase() and substring() on the car_makers array is that we are first converting it to a string using toString(). Without toString(), using string functions on an array would lead to an error.
Back to array functions, the next function we will discuss is the push() function. This function allows us to push an element onto the end of an array, as follows on line 5:

On line 3 above we print out the length of the array, which is 3, since it begins with three elements. On line 4 we use the push() function to add a new element to the array, which is the string BMW. When we print out the array’s length again on line 6, this time the length is 4, because we have added a new element to the array. On line 7 we use toString() to print out all of the array’s contents, which now has BMW at the end.
The opposite of the push() function is the pop() function, which causes the last element of the array to be “popped” out. (line 4 below):

On line 4, we create a new variable last_element and put the result of car_makers.pop() inside it. When we print out the value of last_element on line 5, we see that the word “Tesla” is printed out in the preview area.
On line 7 we have something interesting. When we print out the array’s contents, we see only Toyota and Ford. The array now has only two elements. This is because the pop() function does two things at the same time: it returns the last element of the array, and it removes that element from the array.
Below, we use a while loop to pop out every element of the array:
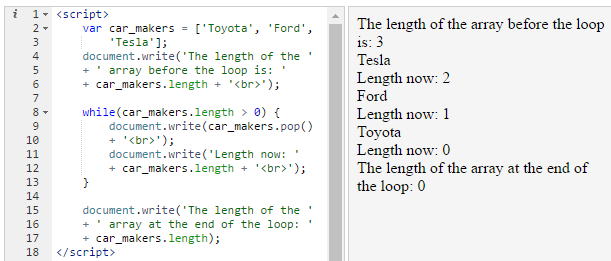
We can even use pop() to remove elements from an array without doing anything with the popped out element, as follows:

Above, the loop on lines 4-6 removes all the elements of the array. When we try to print out the contents of the array using toString() on line 8, nothing is printed out because the array has nothing in it anymore.
An alternative to push() is unshift(), which adds an element to the beginning of an array rather than to its end (line 8 below):

Above, on line 4 we use the already-covered push() function to add BMW as the final element of the car_makers array. We then print out the result on lines 5-6. Next, on line 8 we use unshift() to add KIA as the first element of the array. On printing out the array on line 9, we now see that KIA is the first element of the array (second line of the preview).
Do not worry about memorizing the names of these functions. Even experienced programmers have to look them up at times. What is important is to know such functions exist, it is then easy to find them by doing a web search. For example you can search for “javascript remove last item of array” or “javascript add item to beginning of array” and you will find dozens of websites that mention the relevant functions.
What if for some reason we wanted to move the last element of an array to the beginning? We can do that by using pop() and unshift() together:

Above, on line 4 we are using car_makers.pop() to pop out the last element, but since we are doing it inside the brackets of car_makers.unshift(), the popped out element ends up inside the array but at the beginning, as seen in the preview. If you are a bit confused by this, we can break it down into more steps to make it clearer:

The above code does exactly the same thing as before. On line 4 we pop out the last element and put it inside a variable. Then on line 5 we put the value of this variable into the array as its first element. Instead of using the last_element variable as an intermediary, we could simply write car_makers.unshift(car_makers.pop()) to capture the result of car_makers.pop() and put it back into the array in one step instead of two.
We also have the shift() function which like pop() removes items from the array, but unlike pop() it removes from the front of the array rather than the end.
Deconstructing Shakespeare
In this section, we deconstruct a Shakespeare verse from Sonnet 130 and introduce some new operations in the process.

Above, we first have a very long string in which I have placed the verse. The verse is made up of two lines in the original, as follows:
I love to hear her speak, yet well I know
That music hath a far more pleasing sound;
But to simplify the example, I have turned the verse into one very long string. In the preview area you see the verse broken into three lines simply because there is not enough space to show it all on one line. If I make my browser window larger, the preview area expands and the browser tries to show all of the verse on one line (I have also zoomed out the browser text in order to get a screenshot that would fit within a book):

The split() function
Back to the business at hand, below I use a new string function called split() to split the string and make an array out of it:

On line 7, verse.split(” “) tells JavaScript to split the string at every space. This means that JavaScript creates a new array with the word “I” as its first element, the word “love” as the second element, “to” as the third element, “hear” as the fourth element, and so on. The stuff between the two quotation marks is what JavaScript will split the string at: at present we have placed a space between the quotation marks. On line 8, we print out the second item of the result stored in the verse_words variable, which is the word “love”.
Below I print out the contents of the verse_words array using the toString() function:

Above, the entire array is printed out on one line. Since there isn’t enough space available to see the whole line, we can only see until “know”.
Below I use a for loop to print out all of the contents of the verse_words array, with each array element on its own line:
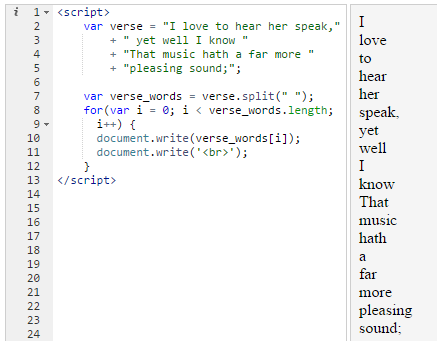
A new type of for loop
We can now introduce a new type of loop that is often useful when going over an array. This loop is also a for loop, but it uses a special syntax in the conditional:
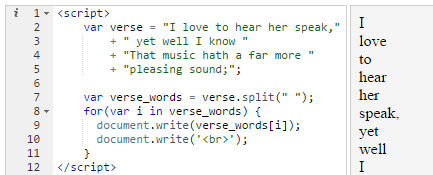
The above loop does exactly the same thing as the earlier loop. You can think of it as something of a shorthand that is easier to type. The meaning of for (var i in verse_words) is: “for each element in verse_words, do the following, while using i to represent the index value of the current element”.
Catching words
We are now ready to perform operations on the verse_words array. For example, below, I have updated the loop to print out words starting with “h”:
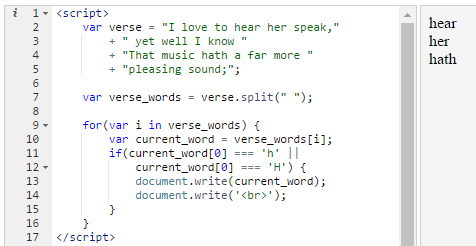
On line 10, I put the current array element into a new variable named current_word. On lines 11-12, I check whether the first letter of current_word is a lowercase or uppercase “h”. current_word[0] means “the first character of the string” when we are dealing with a string, as has been covered before.
On lines 11-12 we need to do two checks rather than one because in JavaScript an “h” is different from an “H”. If we had only written if(current_word[0] === ‘h’), this would not have caught any words starting with an “H”. The condition therefore says: “If the word’s first character is a lower case “h”, OR if it is an uppercase “H”, then do this”.
As can be seen in the preview area, the loop detected three words that started with an “h”.
The charAt() function
Programmers generally reserve accessing variables by index (as in my_var[0]) for arrays. It is confusing and unusual to use it on a string. We have done it so far for simplicity’s sake. The better and safer method is to use the charAt() string function, as follows on line 11:
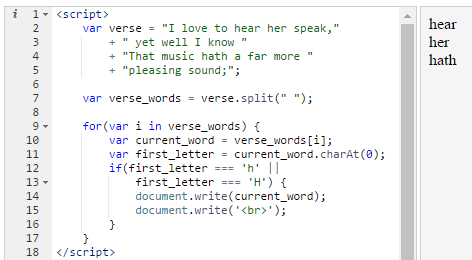
Above, on line 11 I create a new variable named first_letter. I use current_word.chartAt(0) to extract the first character of current_word. The zero refers to index 0 of the string.
Nested loops
Below, we have a new piece of code that finds every word that contains the letter “i” or “I” at any point (not just the beginning of the word):
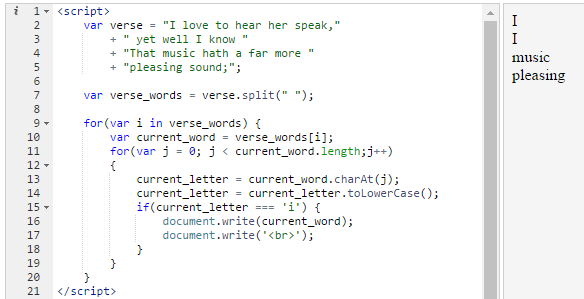
We have a nested loop above, meaning one loop inside another. First we loop over all of the array elements, and inside of that, we loop over every character of every word. The first thing to notice is that on line 11, we are using j inside the inner for loop rather than i, because the variable name i is already being used by the outer loop. Using the same variable name in both loops would not make sense and would lead to errors.
In order to make it easier to understand what is going on in the code, below I have added some extra document.write() statements:
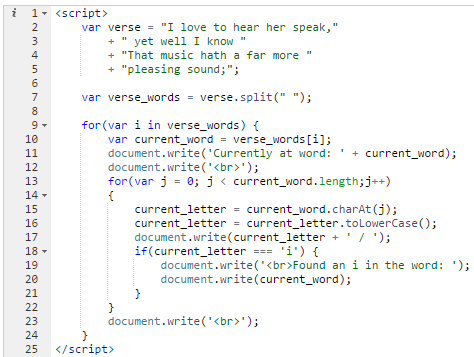
Here is a sample of the result in the preview area:
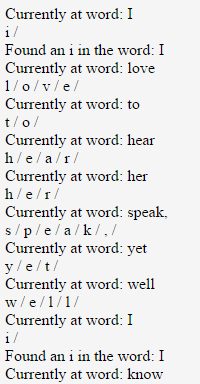
In the outer loop we print out which word we are currently processing (on line 11). In the inner loop, we print out each letter we are processing followed by a slash, in order to separate it from the letter that comes after it. If the inner loop finds any occurrences of the letter “i”, it prints out “Found an i…” on line 19. Once the inner loop is done, we print out a new line on line 23.
At that point, the code goes back to the top of the outer loop, which will process the next word, and so on and so forth.
Notice that on line 15 we wrote chartAt(j) rather than chartAt(0) because j changes with each inner loop, starting at 0 and going up to the final index of the string.
Joining array elements
We have already covered the split() function that turns a string into an array by splitting it up. The join() function performs the opposite function. It joins the elements of an array and gives us a string back:

Above, on line 7 we split the verse string in to an array as usual. On line 9, we use join() to turn it back into a string. Since the argument to the join() function is ‘ / ‘, the array elements are separated by spaces and slashes. This argument could be anything we want. Below I have chosen an asterisk and space:

The argument could even be a <br> tag to make each array element appear on its own line:
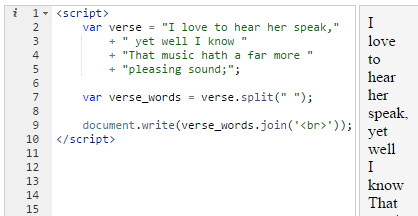
9. Objects
We have come to the final important data type in JavaScript, objects. Not all languages have this data type. It is, however, one of the most useful data types in JavaScript and it is essential for building large-scale JavaScript programs.
In order to speak about objects, we will start by looking at an example array:

Above, the student_data holds information about a student named Sophia Davis. The problem with this data is that you cannot be exactly sure what the different values stand for. The second element of the array is the number “2”, which probably stands for her grade. The next element looks like a ZIP code, and the next two elements look like the student’s mother and father names. Now imagine if there were fifty more elements in the array. It could become unmanageably difficult to make sense of the array.
Below is an object named student_data that holds the same data as before:
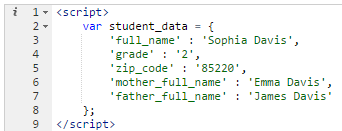
Above student_data is now an object. Objects are declared using curly braces {}. An object is made up of what are known as key-value pairs. They key “full_name” is associated with the value “Sophia Davis”.
Both arrays and objects are like tables, but with a crucial difference. An array is like a table with numbers as its first column. You find each item by looking up its number:
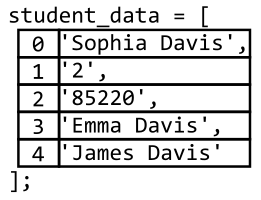
But an object is like a table with descriptive labels as its first column rather than numbers, making it possible to look up each value by a label (or key) rather than a number:
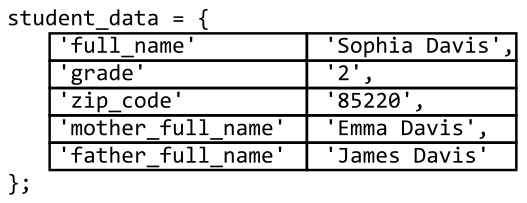
Below is an example of accessing an object’s value by a key:

On line 9, using the statement student_data.full_name, we access the value we associated with the full_name key on line 3. The key-value pair is called a “property”. For example we say that full_name is a property of the student_data object whose key is full_name and whose value is “Sophia Davis”.
Objects can be nested, which allows us to create highly readable and useful ways of representing our data:
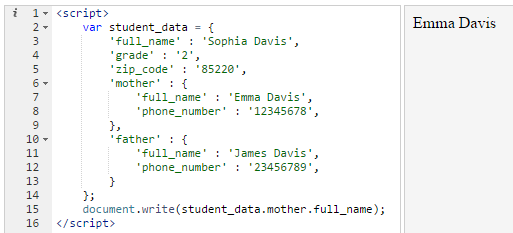
Above, I have removed the mother_full_name key. Instead, we now have a mother key that refers to a new object with two keys, full_name and phone_number. It is the same for the father’s data. On line 15 I use student_data.mother.full_name to get the student’s mother’s full name.
Another way to declare objects is to declare an empty object then add stuff to it later on:

Above, note that only the student variable needs to be declared with a var. The rest of the declarations do not need a var.
Below we have an object variable named city that represents the city of Ann Arbor in Michigan:
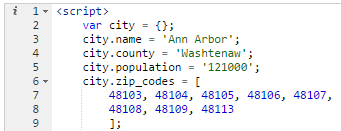
We use an array to represent the city’s eight ZIP codes, meaning that zip_codes is an array that is inside the city object. We can use this array like any other array, as follows:
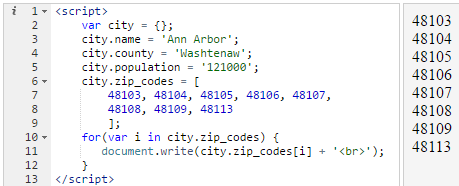
The above is the same as the below.
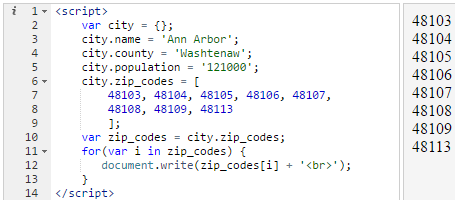
Above I create a new variable named zip_codes on line 10 and put the city.zip_codes array inside it, then I use the new zip_codes variable inside the loop.
The coffee robot
In this section we will discuss a simple system for communicating with a coffee-making robot using an object. This is something that can actually work in the real world, provided that you have a friend who works as a “back-end” programmer and knows how to write software that can understand requests sent from JavaScript.
We will start by declaring a new object that represents the cup of coffee we want the robot to make:

Next we will declare what kind of cup of coffee we want:
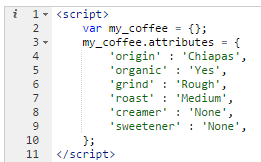
Next we will declare a function that sends the order to the robot:
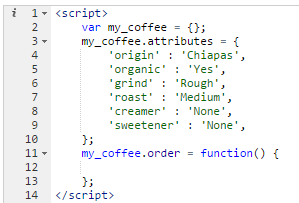
Above I have declared a function named order on lines 11-13. As you can see, an object can hold functions. This function can be called by writing my_coffee.order(). Note the way we declared the function on line 11, which is different from the way we have done it before. Normally you would write function order() { }. But here, we are using a different method of defining functions, which is to declare it “anonymously” (without specifying a name for it) then put it inside a variable, in this case the my_coffee.order variable. Even though this function is technically nameless, since we have put it inside a variable, we can use it like any other function by using the variable’s name.
The function is at present empty. The first thing we need is a way to access the attributes of the cup of coffee so that we can send them to the robot. In order to do that, we use a new concept known as this.

The this keyword is used to refer to the current object. When we write this.attributes on line 12, JavaScript knows that we mean my_coffee.attributes since we are inside a function that is inside this object. Think of this as meaning “the current object we are inside of” and it should make sense.
Next we will define the part of the function that actually communicates with the robot, on lines 14-24:
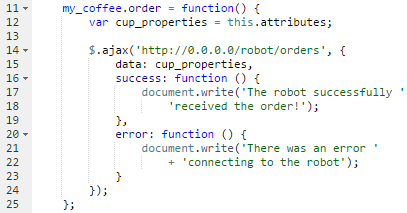
Explaining what is going above is beyond the scope of this book, it is merely there to show readers that JavaScript is not merely a toy, it can actually communicate with real-world machines and control them. What we are doing is sending an “AJAX” request using something called jQuery to the robot’s Internet address. On line 15 we have data: cup_properties, this means that when we communicate with the robot, we send it the details of the type of cup of coffee we declared earlier. Note that running this code on your local machine will not work since the Internet address defined on line 14 is not a real address.
Above we have only declared the function. If we run the code nothing happens since we are not actually calling the function. The final step would therefore be to call the order function:

If everything works correctly, running the code would cause the preview area to show the following message:

Bracket notation and dynamic properties
We have already seen how an object property can be accessed using dot notation, as in student.full_name. There is another way of accessing the same property by using bracket notation, as in student[“full_name”]:

Above, on line 4 we access the full_name property of the student object using dot notation, while on line 6 we use bracket notation. The result is the same in both cases.
Printing objects
We cannot use object.toString() to print out the contents of an object. Doing so will always cause JavaScript to display [object Object] regardless of what the object contains:

In this section we will create our own object printing function. The second loop shown earlier already showed how to do this.
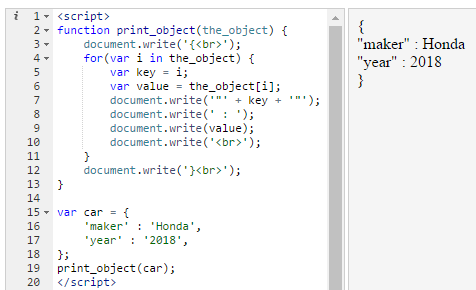
Above, the new print_object function takes an object and prints out its contents. On line 3 we print out an opening curly brace and a new line. On line 12 we print out a closing curly brace and a new line. These curly braces are not necessary, they are simply for presentation purposes to help a reader immediately know that what is shown is an object’s contents. On line 7 we write out ‘”‘ + key + ‘”‘. This prints out the key with a double quotation mark before it and a double quotation mark after it. In the preview area you can see that “maker” and “year” have quotation marks. The strange syntax ‘”‘ simply means “a string that contains a double quotation mark”. The single quotation marks before and after it are used to enclose the string, similar to the way the string ‘Apple’ has a single quotation mark before it and after it to tell JavaScript where the string starts and where it ends. To clarify further, below I have temporarily changed line 7 so that it now puts asterisks rather than quotation marks before and after each key:
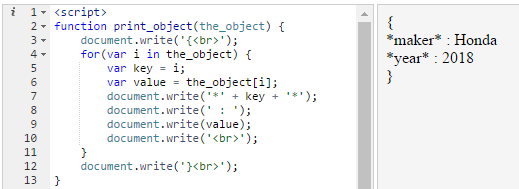
Printing nested objects
The above printing function only works on simple objects. If we pass it an object that contains another object, the following happens:
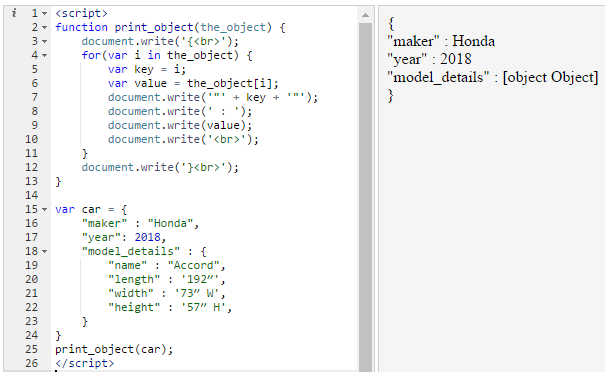
As you can see, the model_details property is printed out as [object Object]. This is because on line 9 the document.write(value) statement forces JavaScript to interpret the nested object as a string. Since JavaScript is not designed to handle this, it simply tells us that we are trying to force an object to become a string.
In order to make print_object handle nested objects, we use a technique known as recursion:
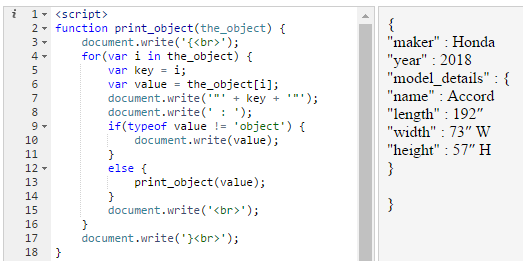
On line 9 we use the new typeof operator, which is used to check the data type of a variable. The check if(typeof value != ‘object’) means “if the data type of the value variable is not the object data type”. We are saying if the current property we are dealing with is not an object, then do the normal thing on line 10, which is to use document.write() to print out its contents. But if it is an object, meaning if we are dealing with a nested object, then instead the else part runs. In the else part we do something wonderful that programming allows us to do, which is to use a function inside itself. If we are printing a nested object, we simply call a new instance of the print_object function to print that nested object. This means that even if we had a dozen objects nested in one another, this function could handle them. Each time it sees a nested object, it passes control to a new version of the print_object function that deals specifically with the nested object.
When the loop inside print_object() function reaches the model_details property, the else part runs. The value variable that we pass into the second print_object() function on line 13 is actually an object, as if we had written:
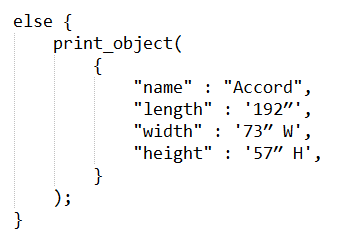
JavaScript starts a new separate instance of the print_object() function that deals solely with this nested object, not caring about the previous print_object() function that is also running. However, since JavaScript executes code line by line, the inner print_object() function has to finish like any other statement before JavaScript goes on with the loop in the outer print_object() function.
Recursion is relatively complicated and programmers rarely use it in their day-to-day work. But there are some situations that it is ideally suited for.
10. Regular Expressions
Regular expressions enable us to use patterns to do search and replace within a piece of text. You may have used “wildcards” in programs like Microsoft Word. Below is an example in which we put the wildcard c?t in Word’s Find and Replace dialog:
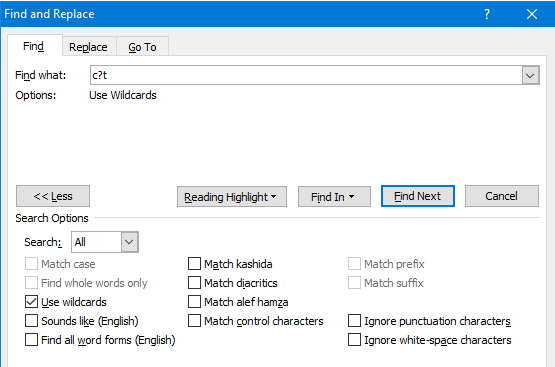
In Word, doing a wildcard search for c?t finds any 3-character string that starts with a c and ends with “t”, such as “cat” and “cot”.
In JavaScript, regular expressions help us achieve the same kind of thing. Below we use a regular expression to check whether the string variable text contains the string “is a”:

The regular expression is on line 4. It starts with a forward slash and ends with a forward slash. Regular expressions are not strings, arrays, plain objects or any other data type. They are their own independent thing. On line 5, we use the test() function (which only works on regular expressions) to test whether the text variable satisfies the regular expression or not. The result is a boolean “true” as seen in the preview area, meaning that the text variable does indeed satisfy the /is a/ regular expression (since it contains “is a”).
Below we change the regular expression to test whether the string contains “it” or not:

The result is false because the variable text contains “It”, not “it”. We can make our regular expression case-insensitive so that it will match both uppercase and lowercase characters as follows:

Above, I have added an i after the regular expression’s ending slash on line 4. This is called a “modifier”, it modifies how the regular expression works. The i stands for insensitive, making the regular expression insensitive to the difference between upper and lower case characters so that it matches both.
Since the test() function returns a boolean true or false, we can use it in if statements as follows:

We can also use a regular expression directly without putting it in a variable (line 4 below):

Besides the test() function, we also have the more interesting match() function. This function is actually a string function, meaning that it has to be called on strings rather than regular expressions, so that using this function is the reverse of the way we used the test() function.

The text.match() function returns an array that contains all the strings matched by the regular expression we give to it. Above, we search for “good”, and unsurprisingly, the matches array contains “good” as its only element when we print it out.
Below I update the text variable so that it now contains a passage from The Mill on the Floss. I have made the whole passage fit on one line in the code in order to save space. On line 3 I have printed out the text variable so that you can see part of the string in the preview area.
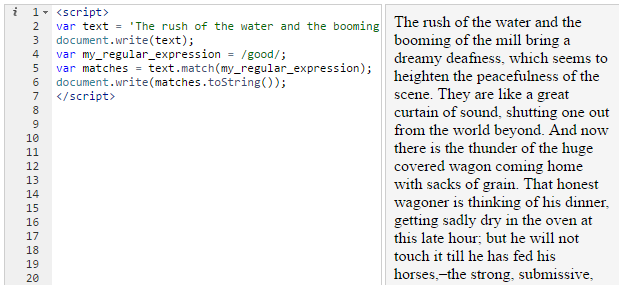
I now remove the document.write() statement on line 3. The code shown earlier actually causes an error in JavaScript when we run it. When looking at the console we see the following:

This cryptic error message is telling us we have used the toString() function on line 6 on something that is null. What it actually means is that the matches array is not actually an array, it is null. This is because the new string inside text does not contain the word “good” that we are searching for. The match() function on line 5 returns null. This means that the matches variable contains null, so that using toString() on it leads to an error and breaks our code, since toString() is not designed to be used on variables that contain null. To avoid this error, we have to check whether the matches array is null or not before we try to print it out:

Above, we check if matches is null on line 6. If so, we print out a helpful message. If it is not null, then we use toString() to print out its contents on line 10.
Below, we update the regular expression to search for “ the ” (a space followed by “the” followed by a space):
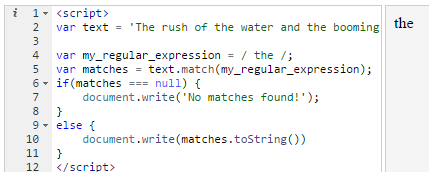
In the preview area only one “ the ” gets printed out even though the text variable obviously contains multiple occurrences of the word “the”. This is caused by the fact that JavaScript regular expressions by default stop searching once they find a single match. In order to find all occurrences of a word, we have to use the g modifier (which stands for “global”), as follows:

Now all occurrences of “ the ” are printed out. That is not very useful at the moment. One use of this code however would be to find out how many times the string we are searching for occurs in the text, as follows:
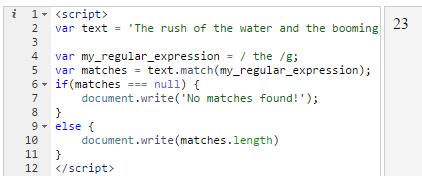
Above, I have changed line 10 to print out the length of the matches array, which equals 23, meaning that “ the ” occurs 23 times inside the text variable.
We can now move on to the more interesting part of regular expression: wildcards. The following regular expression matches all 3-character-long strings starting with an “a”:

The regular expression /a../g means “a string starting with a, followed by any character, followed by any character”. Inside regular expressions dots stand for “any character”. The preview area shows us a large number of matches. The results are messy because the regular expression matches inside words and between words. The first match is “ate”, which is from the word “water”. JavaScript does not care that this match is in the middle of a word since we have not told it to care. There is also the match “a g” (“a” followed by a space followed by a “g”) which is from the string “a great”. The dot wildcard matches spaces too, so this is a perfectly good match.
We can improve the results we get by updating the regular expression to have a space before and after it (line 4):

Above, I have changed /a../g to / a.. /g. The meaning of the new regular expression is “a space, followed by an ‘a’, followed by any character, followed by any character, followed by a space”.
The next wildcard we will look at is the question mark wildcard. This wildcard makes the pattern that comes before it optional (line 4):

Above I have added a question mark right after the “a” in the regular expression on line 4. The result is that we now have many more matches. The regular expression / a?.. /g means: “(a space)(‘a’ or nothing)(any character)(any character)(a space)”. The question mark after the “a” makes the “a” optional, so that the regular expression will match any string that matches the rest of the pattern whether or not the “a” is present at that place. The result is that “of” is the first match we get.
Regular expressions are like a programming language within a programming language. They have their own syntax and logic, for this reason it will take learners a long time to familiarize themselves with them and master them. Like everything else in programming, reading and writing code is the best way to learn how to use regular expressions.
Replacing strings
The replace() function allows us to use patterns to replace one part of a string with something else. This function takes two arguments. The first argument is a pattern. The second argument is the string we want to replace the pattern with:

Above, we have given the regular expression /r/ as the first argument to replace(). The second argument is the string ‘b’. This tells JavaScript to replace the string that matches /r/ with the string “b”. The result is that the word “rush” is now “bush” in the preview area. Below I add the g modifier to the regular expression, so that it now replaces all of the matches of the pattern not just the first one (line 3):

Above, you can see that the word “water” has become “wateb” in the preview area, since we are now replacing all r’s with b’s.
Now onto a useful example: what if your boss gave you a list of 10,000 names and asked you to turn every middle name to an initial (for example Henry Newton Smith would become Henry N. Smith)? We can accomplish this in a few relatively simple lines. In our example, we will use the names of three American economists to simply the example:
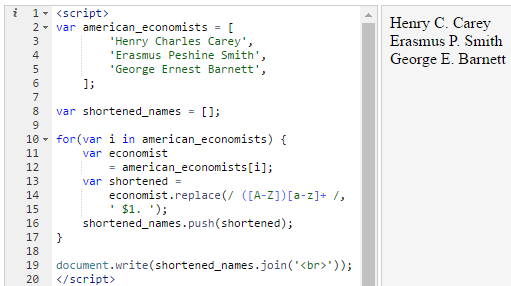
The code should be self-explanatory except for lines 14 and 15. An illustration is perhaps the best way to explain the regular expression on line 14:
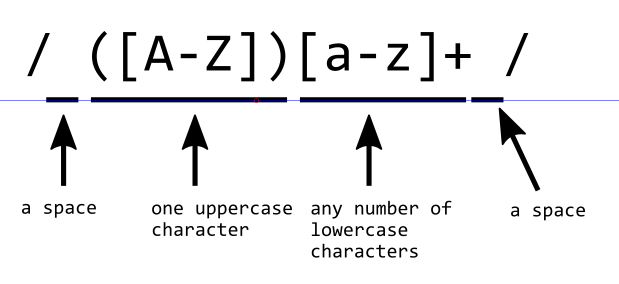
We have a number of new concepts in this regular expression. The first one is the stuff in the square brackets, such as [A-Z]. This is known as a character class and means “any character from uppercase A to uppercase Z”. We also have another character class [a-z] which means “any character from lowercase a to lowercase z”. The first character class is inside round brackets ([A-Z]). Inside regular expressions brackets have a very special meaning and the stuff inside them is known as a “capturing group”. They tell JavaScript to store the stuff in the brackets in a variable that we can later refer to using a dollar sign and a number (that is what the $1 on line 15 does).
The other new thing is the plus sign after the second character class. This sign means “one or more of the preceding pattern”. In other words, [a-z]+ means “one or more lowercase characters”.
The regular expression as a whole matches middle names, since middle names have a space before them, start with an uppercase character and have any number of lowercase characters after that and have a space after them.
The second argument of the replace() function is ‘ $1. ‘. This means “a space, followed by whatever was matched by the capturing group, followed by a space. If the regular expression on line 14 had matched “ Charles ”, since the capturing group on line 14 only captures the first character of the name, all of the string “ Charles” is replaced by “ C. ”.
All of lines 14 and 15 can be interpreted as “find a middle name, save the first character of the middle name in a variable named $1, then replace all of the middle name with the value inside this variable, followed by a dot.”
Comments
In programming, comments are pieces of text inside our code that do nothing. They are just there for the benefit of programmers to help them understand the code better. Below I have added a comment on line 13:
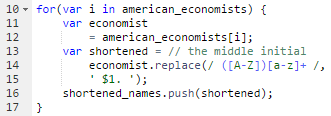
The comment on line 13 starts with a double forward slash. This tells JavaScript this is a comment. Anything after the double slashes will be ignored by JavaScript, but programmers reading the code will have an easier time understanding what the code does, since it will not be obvious even to an experienced programmer what the regular expression does unless they wait for a few seconds to decipher it. But if they see the comment, they can instantly realize that it is trying to get the middle initial of the name.
The above type of comment is known as a single line comment. We also have mutli-line comments that allow us to write whole paragraphs of text as a comment:
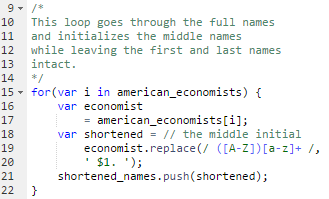
A multi-line comment starts with a slash followed by an asterisk (line 9) and ends with an asterisk followed by a slash (line 14).
Instead of using a multi-line comment we can use multiple single line comments as follows:
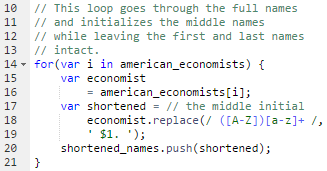
It is always best to write your code to be self-explanatory so that it will not require comments. By giving your variables and functions easy-to-understand names, the code will be easy to understand. Regular expressions, however, are an exception. It is almost always a good idea to write a comment explaining what the regular expression does, otherwise if you are reading your own code months later you may have no idea what the regular expression is meant to do and may waste many precious minutes deciphering its purpose.
Where to go next
At this point you have mastered the basic concepts of programming. You can go on to learn any language you choose, be it C, PHP (used by web servers), Python or Swift (used by Apple apps) and you will find most of the concepts already familiar.
If your goal is to go on to build websites, you have to master what is known as a technology stack. You will need HTML and CSS for building web pages (along with JavaScript). The author’s HTML & CSS for Complete Beginners is a user-friendly guide to these two languages.
You will also need a server scripting language, such as PHP, Ruby or Python. You will also need some knowledge of the database language SQL.
WordPress.org is a great system for beginners who want to build websites. It already has everything set up (HTML, CSS, JavaScript, PHP and MySQL) and it can allow you to get a website up and running in minutes. I highly recommend using WordPress or another framework as a learning tool because tinkering with already-built systems is a great way of mastering programming. The author’s Cloud Computing for Complete Beginners teaches how to get your very own Linux web server and get a WordPress-based website working on it. If you want to do some “real” web development work then this is a great place to start, since once you are done you will have a fully functional website on the Internet. Note that I am referring to WordPress.org, the free and self-hosted version of this software. There is also WordPress.com, which is a blogging service that makes use of WordPress.org but lacks many of its capabilities. For learning it is WordPress.org that should be used.
If you want to build games to be played on Android and iOS devices, you can check out the Unity framework. This is a program that allows you to build a game using visual tools and the C# (C-Sharp) language. When the game is ready, it can be “exported” to both Android and iOS without having to worry too much about the differences between these two systems.
If your goal is to build apps (not games) for mobile devices, React Native is the most popular tool right now and uses JavaScript as its basis and is used by some of the biggest tech companies.
If you are some sort of business manager and wish to put your new programming skills to good use, you can import spreadsheets into Google Spreadsheets then use JavaScript to run little programs on the spreadsheet to do all sorts of advanced calculations (do a web search for “google spreadsheet scripting”).
If you are interested in a more academic study of programming, you can search for books on object oriented programming, data structures and algorithms.
Notes
- [←1]
-
http://hawramani.com/wp-content/jstinker/index.html
- [←2]
-
jsfiddle.net
- [←3]
-
codepen.io
- [←4]
-
The more technically correct name for this type of function is “method”. As we have discussed, functions take an input and return a result. Methods, however, operate on the thing they are called on and often do not take any inputs and sometimes do not return any outputs. To avoid over-complicating the matter I will continue referring to them as functions.
