12 Islamic articles on: programming

A guide to using PHP to download OneDrive files selected by users in the OneDrive Picker

In my previous blog post  I described how to get the OneDrive picker to work on a local development server. In this post I will describe the second piece of the puzzle, downloading the file to a local server using PHP after the user selects it:

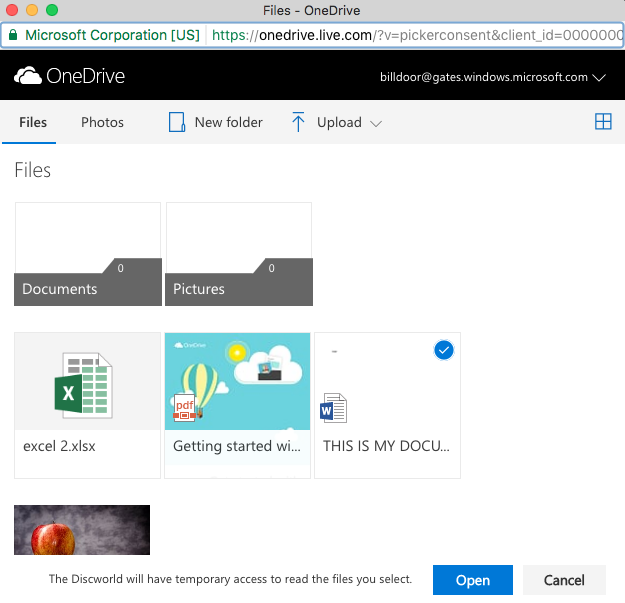
First, below is the JavaScript/jQuery used to open the file picker:

$(function() {
    $('.onedrive-button').click(function() {
        openOneDrivePicker();
    });
});

function openOneDrivePicker() {
    var odOptions = {
        clientId: client_id,
        action: "download",
        advanced: {
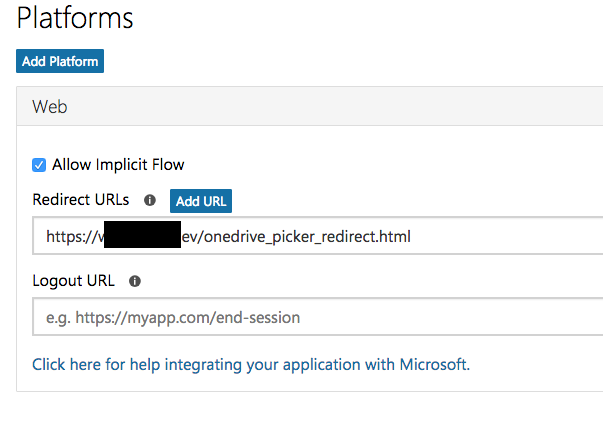
            redirectUri: redirect_uri,
        },
        multiSelect: true,
        openInNewWindow: true,
        success: function (files) { /* success handler */
            var files_array = files.value;
            for(var i in files_array) {
                window.processOneDriveFile(files_array[i]);
            }
        },
        cancel: function () { /* cancel handler */
        },
        error: function (e) { /* error handler */
        }
    }
    OneDrive.open(odOptions);
}

The success method goes through the file or files selected and calls a function called processOneDriveFile() on each one of the file objects.

Below is the code to the processOneDriveFile() function, which submits the file to a PHP handler file called file_handler.php:

// this function automatically submits the file to the server as soon
// as the user picks a file from the OneDrive picker. You may
// instead want to store the files in a variable and only submit when
// the user clicks some "Submit" button somewhere in your app.
function processOneDriveFile(file) {
    var file_name = file.name;
    var file_size = file.size;
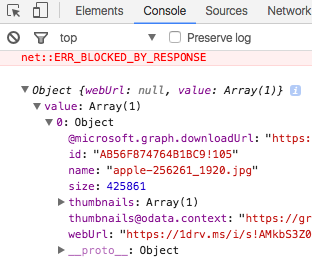
    var download_url = file['@microsoft.graph.downloadUrl'];

    var data = {
        file_name : file_name,
        file_size : file_size,
        download_url : download_url,
        command : 'handle-onedrive-file',
    };
    
    $.ajax({
        url: '/path/to/file_handler.php',
        type: 'post',
        data: data,
        error: function (data) {
            console.debug(data);
        },
        success: function (data) {
            // success message
        }
    });
}

And here is the code for file_handler.php:

// bootstrap code

$command = $_POST['command'];

if('handle-onedrive-file' === $command) {
 $file_name = $_POST['file_name'];
 $file_size = $_POST['file_size'];
 $download_url = $_POST['download_url'];

 $ch = curl_init($download_url);
 curl_setopt($ch, CURLOPT_HEADER, 0);
 curl_setopt($ch, CURLOPT_RETURNTRANSFER, 1);
 curl_setopt($ch, CURLOPT_BINARYTRANSFER, 1);
 curl_setopt($ch, CURLOPT_FOLLOWLOCATION, true);
 curl_setopt($ch, CURLOPT_SSL_VERIFYPEER, false);
 curl_setopt($ch, CURLOPT_SSL_VERIFYHOST, false);
 curl_setopt($ch, CURLOPT_CONNECTTIMEOUT, 20);

 $data = curl_exec($ch);
 $code = curl_getinfo($ch, CURLINFO_HTTP_CODE);
 $content_type = curl_getinfo($ch, CURLINFO_CONTENT_TYPE);
 $error = curl_errno($ch);
 curl_close($ch);
 
 // A file with the same name may exist, that must be handled.
 $file_save_path = '/some/path/' . $file_name;

 file_put_contents($file_save_path, $data);
 
 echo 'File successfully retrieved and stored!';
}

That’s all. Make sure that the curl PHP library is installed and enabled (it is not sufficient to have the Linux curl utility, the code above uses the PHP library for it).

A guide to using PHP to download Google Drive files selected by users in the Google Drive Picker

Let’s say you’ve managed to get the Google Drive JavaScript Picker API to work, and have also managed to coerce your users into logging into the Picker and selecting one of their files:

And you have verified that the onSelect function works properly:

function initGoogleDrivePicker() {
    var picker = new FilePicker({
        apiKey: api_key,
        clientId: client_id,
        buttonEl: document.getElementsByClassName('google-drive-button')[0],
        onSelect: function (file) {
            console.debug(file);
        }
    });
}

Where to go from here to send the file to the server and have it saved there?

First, we’ll create a function called processGoogleDriveFile(file), which will be added to the onSelect function of the picker:

function initGoogleDrivePicker() {
    var picker = new FilePicker({
        apiKey: api_key,
        clientId: client_id,
        buttonEl: document.getElementsByClassName('google-drive-button')[0],
        onSelect: function (file) {
            processGoogleDriveFile(file);
        }
    });
}

The function will be as follows. It will extract the file’s information, then use a jQuery AJAX request to send it to a PHP file called file_handler.php:

// this function automatically submits the file to the server as soon
// as the user picks a file from the Google Drive picker. You may
// instead want to store the files in a variable and only submit when
// the user clicks some "Submit" button somewhere in your app.
function processGoogleDriveFile(file) {
    var data = {
        file_id : file.id,
        file_name : file.title,
        extension: file.fileExtension,
        mime_type : file.mimeType,
        // the function below is provided by the library
        // from https://gist.github.com/Daniel15/5994054
        access_token : gapi.auth.getToken().access_token,
        command : 'handle-google-drive-file',
    };
    
    $.ajax({
        url: '/path/to/file_handler.php',
        type: 'post',
        data: data,
        error: function (data) {
            console.debug(data);
        },
        success: function (data) {
            // success message
        }
    });
}

On the back-end side, in file_handler.php, we have the following code:

// bootstrap code

$command = $_POST['command'];

if('handle-google-drive-file' === $command) {
    $file_id = $_POST['file_id'];
    $file_name = $_POST['file_name'];
    $extension = $_POST['extension'];
    $mime_type = $_POST['mime_type'];
    $access_token = $_POST['access_token'];
    
    // if this is a Google Docs file type (Google Docs, 
    // Spreadsheets, Presentations, etc.) we convert it
    // to a PDF using the export function of the API before saving it.
    // we could convert it to other file types that are also supported
    // by the API.
    if (stripos($mime_type, 'google')) {
        $getUrl = 'https://www.googleapis.com/drive/v2/files/' . $file_id .
        '/export?mimeType=application/pdf';
        $authHeader = 'Authorization: Bearer ' . $access_token;
        $file_name = $file_name . " (converted)";
        $extension = 'pdf';
        $file_mime_type = 'application/pdf';
    }
    else { // otherwise we download it the normal way
        $getUrl = 'https://www.googleapis.com/drive/v2/files/' . $file_id . 
        '?alt=media';
        $authHeader = 'Authorization: Bearer ' . $access_token;
    }

    $ch = curl_init($getUrl);
    curl_setopt($ch, CURLOPT_HEADER, 0);
    curl_setopt($ch, CURLOPT_RETURNTRANSFER, 1);
    curl_setopt($ch, CURLOPT_BINARYTRANSFER, 1);
    curl_setopt($ch, CURLOPT_FOLLOWLOCATION, true);
    curl_setopt($ch, CURLOPT_SSL_VERIFYPEER, false);
    curl_setopt($ch, CURLOPT_SSL_VERIFYHOST, false);
    curl_setopt($ch, CURLOPT_CONNECTTIMEOUT, 20);
    curl_setopt($ch, CURLOPT_HTTPHEADER, [$authHeader]);


    $data = curl_exec($ch);
    $code = curl_getinfo($ch, CURLINFO_HTTP_CODE);
    $error = curl_errno($ch);
    curl_close($ch);

    // 1. the file name could already have an extension in some cases,
    // that must be handled if needed.
    // 2. A file with the same name may exist, that must be handled.
    $file_save_path = '/some/path/' . $file_name . '.' . $extension;

    file_put_contents($file_save_path, $data);
    
    echo 'File successfully retrieved and stored!';
}

That’s all that is needed. Not all of Google’s proprietary MIME types can be converted to PDF. You must add a check to the onSelect or processGoogleDriveFile() JavaScript functions to check whether this is a MIME type you want to support. If it not, you can alert the user to choose another file.

Make sure that the curl PHP library is installed and enabled (it is not sufficient to have the Linux curl utility, the code above uses the PHP library for it).

How to get a demo of the OneDrive File Picker JavaScript SDK to work on a local development server

After getting the Google Drive file picker working on the page of a project I’m working on within just a few hours, I was faced with the task of getting the OneDrive JavaScript Picker to work, which I almost abandoned because of Microsoft’s brain-dead documentation. After hours of watching Microsoft videos and piecing together documentation, I finally got it to work.

Through it all, I was often reminded of this good old joke:

A helicopter was flying around above Seattle when an electrical malfunction disabled all of the aircraft's electronic navigation and communications qquipment. Due to the clouds and haze, the pilot could not determine the helicopter's position and course to fly to the airport. The pilot saw a tall building, flew toward it, circled, drew a handwritten sign, and held it in the helicopter's window. The pilot's sign said "WHERE AM I?" in large letters. People in the tall building quickly responded to the aircraft, drew a large sign and held it in a building window. Their sign read: "YOU ARE IN A HELICOPTER." The pilot smiled, waved, looked at her map, determined the course to steer to SEATAC airport, and landed safely. After they were on the ground, the co-pilot asked the pilot how the "YOU ARE IN A HELICOPTER" sign helped determine their position. The pilot responded "I knew that had to be the Microsoft building because, like their technical support, online help and product documentation, the response they gave me was technically correct, but completely useless."

So here is how to actually get their amazing picker to work. I will assume you’ve already created your app in the App Portal.

1. Enabling SSL

You must first enable SSL on your demo server if you don’t have it. To do that quickly and for free, create a self-signed certificate and install it. Here is a guide on creating a self-signed SSL certificate.

When creating the certificate, don’t forget to use the Fully Qualified Domain Name for your local server. I use the fake domain myproject.dev as the domain name for my project, and put www.myproject.dev as the FQDN.

After you have generated your .key and .crt files, put them in /etc/ssl/crt/ or some such similar place.

With that done, create an SSL virtual host that uses the files you created, as follows (this is for a PHP website). The following code will have to be added wherever you have your VirtualHosts, it could be apache2.conf, or in a new file (such as ssl_vhost.conf) placed inside the sites-available directory (/etc/apache2/sites-available). If you put it in sites-available, you will have to run the command a2endsite /etc/apache2/sites-available/the_file_name_I_used.conf to enable the vhost.


ServerName default

## Vhost docroot
DocumentRoot "/var/www/html"
SSLEngine on
SSLCertificateFile /etc/ssl/crt/myproject.crt
SSLCertificateKeyFile /etc/ssl/crt/myproject.key

## Directories, there should at least be a declaration for /var/www/html

Options Indexes FollowSymlinks MultiViews
AllowOverride All
Require all granted


Require all granted
SetHandler proxy:fcgi://127.0.0.1:9000
## Logging
ErrorLog "/var/log/apache2/default_vhost_error.log"
ServerSignature Off
CustomLog "/var/log/apache2/default_vhost_access.log" combined

## Custom fragment

2. Creating the URI Redirect File

Somewhere in your file structure, for example in /var/www/html, create a file called onedrive_picker_redirect.html (or any other name you choose). The file has to load the OneDrive JavaScript SDK, it doesn’t have to do anything else. Here is the contents of the file (note that I’m using version 7.0 of the SDK, use whichever one you want to use for your project):

3. Add a link to the redirect file in the Microsoft App Portal

Put the full SSL link to the redirect file (such as https://www.myproject.dev/onedrive_picker_redirect.html) in the App portal, as shown in the screenshot below. You can keep the Logout URL blank.

4. Add the redirect file to the OneDrive picker launcher using the “advanced” parameter

We now get to the easy part. On the file from which you want to launch the picker, add the following code to launch the picker, or modify your existing code to match below. Notice the redirectUri parameter, which has to exactly match the one you used in step 3.

5. Go to your demo page using the HTTPS URL

The picker will not work if you try to launch it from a non-https page. If you were doing your development on a non-https URL earlier, you will now have to go to the same page under https. If earlier the page was at www.myproject.dev/onedrive_picker_demo.php, now go to https://www.myproject.dev/onedrive_picker_demo.php.

6. Now try it out

Now click the button to launch the picker. You will get a login prompt. After logging in, you will get the picker. Click on any file you want and click “Open”.

7. Look at the console

To verify that everything is working properly, open the console, and if you used the picker code above that I used, you should see an object that contains the information for the file you picked:

8. Go back to square one

Now that we have gotten Microsoft’s limitless supply of self-absorbed ineptitude out of the way, we can get to do some actual coding to interface with their horrible products and discover entirely new and never-before-experienced ways of suffering.

If you want to send the file info to a server to store it there, see my blog post on using PHP to download OneDrive files picked from the picker.

How I solved “jQuery Ajax Uncaught TypeError: Cannot read property ‘type’ of undefined”

A solution for an error occurring during a jQuery $.ajax request.

I was using this common jQuery Ajax pattern on a page I am working:

    $(function () {
        $(document).on('click', '.create-domain .submit', function (e) {
            e.preventDefault();

            var data = {
                domain_description: $('.create-domain .domain-description-textarea')
        }

            $.ajax({
                type: 'post',
                url: '/process/something.php',
                data: data,
                error: function (data) {
                    console.debug(data);
                },
                success: function (response) {
                   //stuff
                }
            });
        });

But on clicking the submit element, I kept getting this cryptic error:

Uncaught TypeError: Cannot read property 'type' of undefined
    at r.handle (jquery-2.2.4.min.js:3)
    at e (jquery-2.2.4.min.js:4)
    at Gb (jquery-2.2.4.min.js:4)
    at Gb (jquery-2.2.4.min.js:4)
    at Gb (jquery-2.2.4.min.js:4)
    at Gb (jquery-2.2.4.min.js:4)
    at Function.n.param (jquery-2.2.4.min.js:4)
    at Function.ajax (jquery-2.2.4.min.js:4)
    at HTMLButtonElement. (something.php:575)
    at HTMLDocument.dispatch (jquery-2.2.4.min.js:3)
    at HTMLDocument.r.handle (jquery-2.2.4.min.js:3)

The problem was that in the data variable, I was including an HTML element (a textarea) inside the data variable, instead of including the textarea‘s content. Thus the corrected code is (notice the .val() at the end):

            var data = {
                domain_description: $('.create-domain .domain-description-textarea').val(),
        }

Hopefully this will help a few people, helping making the world economy more efficient by 1*10-12% (saving the world economy $107 USD over the next year).

Mashing two regular expressions together in JavaScript on the fly

var pattern1 = /Aug/;
var pattern2 = /ust/;
var fullpattern = (new RegExp( (pattern1+'').replace(/^\/(.*)\/$/,'$1') + (pattern2+'').replace(/^\/(.*)\/$/,'$1') ));

Explanation:

  • pattern1+'' turns (“casts”) the regular expression object into a string.
  • .replace(/^\/(.*)\/$/,'$1') removes the beginning and ending slashes from the pattern
  • new RegExp() turns the resultant string into a regular expression object. There is no need to add back a regular expression delimiter (i.e. slashes usually) since the RegExp() function (“constructor”) adds the delimiter if it is lacking.
  • If you want the resultant expression to have a flag, for example i, you add it so: new RegExp(string,'i');
  • This code is quite unreadable and you might be doing yourself and others a kindness if you use a less clever method. To make it more readable, the technique can be wrapped in a function:
var rmash = function(reg1,reg2) {
var fullpattern = (new RegExp( (reg1+'').replace(/^\/(.*)\/$/,'$1') + (reg2+'').replace(/^\/(.*)\/$/,'$1') ));
return fullpattern;
};

var my_new_pattern = rmash(pattern1,pattern2);

Generalizing the mash function to handle an arbitrary number of regular expressions and flags is left as an exercise.

How to do long-running computations in JavaScript while avoiding the “maximum call stack size exceeded” error

The following program calculates the value of the series of the Basel Problem. The result is a number that starts with 1.644934. Like π, this sequence can go on forever, which means the program never exits. Without proper design, such a program runs into the maximum call stack size exceeded error, which is designed to prevent a program from using too much memory.

var cr = 1;
var total = 0;
var x = function() {

    total = total + (1/(cr*cr));

    
    if(! (cr % 20000)) {
        $('#t1').val(total);
        $('#t2').val(cr);
        setTimeout(x,0);
    }
    else {
        x();
    }
    cr++;

};
x(); //initial call to x().

The solution is to add a setTimeout call somewhere in the program before things get too close to exceeding the call stack. In the above program, cr is a counter variable that starts with 1 and increases by 1 for every iteration of the x function. Using the conditional if(! (cr % 20000)) allows the program to catch its breath every 20,000 iterations and empties the call stack. It checks whether cr is divisible by 20,000 without a remainder. If it is not, we do nothing and let the program run its course. But if is divisible without a remainer, it means we have reached the end of a 20,000 iteration run. When this happens, we output the value of the total and the cr variables to two textboxes, t1 and t2.

Next, instead of calling x() the normal way, we call it via setTimeout(x,0);. As you know, setTimeout is genearlly used to run a function after a certain amount of time has passed, which is why usually the second argument is non-zero. But in this case, we do not need any wait time. The fact that we are calling x() via setTimeout is what matters, as this breaks the flow of the program, allowing proper screen output of the variables and the infinite continuation of the program.

The program is extremely fast, doing 1 million iterations about every 2.4 seconds on my computer. The result (the value of total) is not perfectly accurate due to the limitations of JavaScript numbers. More accuracy can be had using an extended numbers library.

You may wonder why we cannot put all calls to x() inside a setTimeout(). The reason is that doing so prevents the JavaScript interpreter from optimizing the program, causing it to run extremely slowly (about 1000 iterations per second on my computer). Using the method above, we run the program in optimized blocks of 20,000 iterations (the first block is actually 19,999 iterations since cr starts from 1, but for simplicity I have said 20,000 throughout the article).

Using an object anonymously in JavaScript

var month = 'Jan'; //or another three-letter abbreviation

//After the following operation, proper_month will contain the string "January".
var proper_month = {'Jan':'January',
                              'Feb': 'February',
                              'Mar' : 'March',
                              'Apr' : 'April',
                              'May'   : 'May',
                              'Jun'  : 'June',
                              'Jul'  : 'July',
                              'Aug'   : 'August',
                              'Sep'  : 'September',
                              'Oct'   : 'October',
                              'Nov'   : 'November',
                              'Dec'   : 'December'
                             
                             }[month];

Using one category page to show multiple categories in WordPress

[Update: There is probably never a good reason to do this. Instead, create a new category to hold the posts.]

Trying to show multiple categories in one loop is easily the hardest thing I’ve done in WordPress.

  1. First, create a container category where you want your multiple categories to be shown. Let’s call it the MultiCat category and give it the multicat slug. No posts are required to belong to this category, and if they do, it will have no benefit.
  2. Next, add this bit of code to functions.php of your theme. This is where we create a query variable which enables us to identify the multi-category page properly. Update the category slugs below to match the slugs of the categories you want to show together.
    function multi_cat_handler( $query ) {
        if ( $query->is_main_query() && $query->query["category_name"] == 'cat1-slug,cat2-slug,cat3-slug,cat4-slug' ) {
         $query->set("allish",'yes');
        }
    }
    add_action( 'pre_get_posts', 'multi_cat_handler' );
  3. Next, add this code to functions.php. Update multicat to the slug of your multiple categories category. Also update the other slugs as in the previous step.
    function alter_the_query_for_me( $request ) {
        $dummy_query = new WP_Query(); 
        $dummy_query->parse_query( $request );
    	  if($dummy_query->query['category_name'] == 'multicat') {
    		$request['category_name'] = 'cat1-slug,cat2-slug,cat3-slug,cat4-slug';
    	  }
        return $request;
    }
    add_filter( 'request', 'alter_the_query_for_me' );
  4. To display the h1 tag of the MultiCat category page properly, we use the following code:
    if(get_query_var('allish') == 'yes') {
    echo 'Title of the Multiple Categories Page';
    }
    else {
    echo 'Normal code that outputs category title';
    }

    If you do not do the above, when people go to the MultiCat category page, they will see a random title from one of the multiple categories you want to show on the page, which is not the behavior you want.

  5. Below is the main code that outputs your posts. The if clause at the top allows us to know we are on the multiple categories page (we cannot use other methods such as checking category ID, since that will return a random category’s ID from the multiple categories we want to show).


    Here lies the code that outputs your post content


    Here is the loop that outputs your normal categories


    The $args array contains the query we use to pull posts from the database. We are pulling posts from the categories with the IDs of 3, 4, 671 and 672. Notice that in Step 2 we used category slugs, while in this step we are using category IDs. They have to match, and order may matter.

That’s all.

Caveats

The RSS feed of the category page will be the RSS feed of one of the categories shown on the MultiCat page. This may be fixable through using RSS-specific filters, but in my case I had no need for RSS and did not try to find a fix.

How to moderate bbPress submissions that contain links

The most common trait of forum spam submissions is that they contain links. The code below (add it to your main wordpress install’s functions.php theme file) filters new bbPress topics and replies and if it detects a link, it marks the submission as “pending”, allowing moderators to review the submission in the back end before publishing it. The code is working on bbPress version 2.5.4.

The code, however, creates front end issues. If it is a new topic, the user is redirected to a page that contains the topic title but not the topic content. If it is a new reply, the page reloads with no indication of that the reply has been saved. These issues may be solvable with query variables and some jQuery, but in my case, almost all submissions that contain links are guaranteed to be spam, therefore user experience is not a big concern.

function bb_filter_handler($data , $postarr) {
    
   
   //If the post date and post_modified are the same, it is a new reply/topic. But if they are different,
   //it is a moderater editing the reply/topic (such as changing from pending to published status, 
   //therefore we let the data through without filtering. Without this admins/moderators won't be able to
   //change a reply/topic from "pending" status to "published".
if(  strtotime($data["post_date"]) != strtotime($data["post_modified"]    )  ) {
    
    return $data;
}
    
if(   ($data["post_type"] == 'reply' || $data["post_type"] == 'topic') && $data["post_status"] == 'publish'    ) {  

        $text= $data["post_content"];
        
        
        $regex = "((https?|ftp)\:\/\/)?"; // SCHEME 
        $regex .= "([a-z0-9+!*(),;?&=\$_.-]+(\:[a-z0-9+!*(),;?&=\$_.-]+)?@)?"; // User and Pass 
        $regex .= "([a-z0-9-.]*)\.([a-z]{2,3})"; // Host or IP 
        $regex .= "(\:[0-9]{2,5})?"; // Port 
        $regex .= "(\/([a-z0-9+\$_-]\.?)+)*\/?"; // Path 
        $regex .= "(\?[a-z+&\$_.-][a-z0-9;:@&%=+\/\$_.-]*)?"; // GET Query 
        $regex .= "(#[a-z_.-][a-z0-9+\$_.-]*)?"; // Anchor 


           if(preg_match("/$regex/", $text))  { 
                   $data["post_status"] = 'pending';
           } else {
                  //do nothing
           }    
    
    
}

 return $data;
 
}
add_filter( 'wp_insert_post_data', 'bb_filter_handler', '99', 2 );

How to automate and throttle Relevanssi indexing on large websites

First of all, update Relevanssi to the latest version. This significantly increased indexing performance on my 80,000+ page website.

Next, I created the following hacky solution for a problem that shouldn’t exist; the fact that Relevanssi cannot silently index everything without hogging all server resources. First find out the number of pages Relevanssi can index in one go without overloading your server, say 500. Then use the following Tampermonkey script on the Relevanssi settings page. You need Chrome’s Tampermonkey extension. Here’s what the script does:

  1. It enables jQuery on the Relevanssi dashboard.
  2. It waits 15 seconds, then clicks the “Continue indexing” button. Once the indexing is done and the page reloads, it waits 15 seconds, then clicks it again, and so on.
  3. Leave this running in a tab until all pages are indexed, then turn the script off and close the tab.

Below is the code:

// ==UserScript==
// @name       Relevanssi Index Button Clicker
// @namespace  http://hawramani.com
// @version    0.1
// @description  Click click click
// @match      http://mywordpressite.com/wp-admin/options-general.php?page=relevanssi/relevanssi.php
// @copyright  2014 jQuery, Ikram Hawramani
// ==/UserScript==


(function () {
 
    function loadScript(url, callback) {
 
        var script = document.createElement("script")
        script.type = "text/javascript";
 
        if (script.readyState) { //IE
            script.onreadystatechange = function () {
                if (script.readyState == "loaded" || script.readyState == "complete") {
                    script.onreadystatechange = null;
                    callback();
                }
            };
        } else { //Others
            script.onload = function () {
                callback();
            };
        }
 
        script.src = url;
        document.getElementsByTagName("head")[0].appendChild(script);
    }
 
    loadScript("https://ajax.googleapis.com/ajax/libs/jquery/1.6.1/jquery.min.js", function () {
 
         //jQuery loaded
         console.log('jquery loaded');

        setTimeout(function(){$('[name="index_extend"]').click();},15000);
 
    });
 
 
})();

Using query_posts() as if it is get_posts()

Some filters work only with query_posts(); but what if you wanted to use one of these filters in a situation where you would normally use get_posts()? Below is the translation:

Original get_posts() query:

$args = array('orderby'=> 'title', 'order' => 'ASC','fields' =>'ids');

$posts_array = get_posts($args);

Translated to query_posts():

$args = array('posts_per_page'=>-1, 'orderby'=> 'title', 'order' => 'ASC','fields' =>'ids');
// the -1 means return all posts, without it you will get the
// number of posts you've set your blog to show per page

$posts_array = query_posts($args);

// do your thing here

wp_reset_query(); // this stops your get_posts() query from affecting other functions;
                  // without it functions like is_single() will break

How to ignore accents and other diacritics in WordPress/MySQL search (Arabic, French, etc.)

On my new Asmaa.org website, which is an Arabic-language baby name resource, I use a simple loop to show the posts in alphabetical order. Each post title is a baby name:

$args = array( 'paged' => $paged, 'orderby'=> 'title', 'order' => 'ASC',  'cat' => $cat_id);
query_posts($args); ?>
while ( have_posts() ) : the_post()

Since the Arabic alphabet is an abjad, most vowels are added to a word as diacritical marks. This has the unfortunate consequence of causing علم and عَلَم, two words that should be shown very close next to each other, to be shown miles apart in an alphabetical sort.

I solved the issue with this WordPress filter:

add_filter('posts_orderby', 'cleanse_diacritics');

function cleanse_diacritics($d) { //$d is this string: 'wp_posts.post_title ASC' (or sth similar) in a default WordPress install
                          //assuming you are sorting alphabetically ascending
    if(strpos($d,'title') !== false) { //if the string 'title' is in the orderby query, we know that
                                       //we are dealing with an alphabetical sort.
                                       //no need to mess with other queries like order by post_date

// below we replace the default order query WordPress passes to MySQL by
// using a whole bunch of replaces to remove diacritics from the sorting
        $d = 'REPLACE(REPLACE(REPLACE(REPLACE(REPLACE(REPLACE(REPLACE(REPLACE(HEX(REPLACE(
wp_posts.post_title, "-", "")), "D98E", ""), "D98B", ""), "D98F", ""), "D98C", 
""),"D991",""),"D992",""),"D990",""),"D98D","") ASC';
    }
    return $d;
}

I got the nested MySQL replace() functions from this StackOverflow answer.

Explanation: When you run a query_posts(array('orderby' => 'title') function or something similar, the posts_orderby filter can be used to modify the order by part of the MySQL query. We wrap the name of the relevant MySQL column in replace() functions to remove all diacritics using their hex UTF-8 code units, which results in a diacritic-insensitive sort.

If you are dealing with a language other than Arabic, you may need to replace a code with another code (é [C3A9] to e [65] for example) instead of replacing with an empty string.

Considerations

The filter posts_orderby does not seem to work with get_posts(). There is a workaround however; see: Using query_posts() as if it is get_posts().